DNS Filter - Network Deployment
Below you will find the basic steps to deploy DNS Filter to your Network. You can find more options and details in the official DNS Filter knowledge base.
Step One: Provide Your Site Static IP(s) to SolCyber#
Before you make any changes to your network, please provide us with your static IP(s). If this is not done first, DNS Filter will not expect traffic from your location and will deny DNS requests until the IP is added.
A Site is considered a single, physical location (or “network”), which usually has one static address, but may have more if utilizing multiple internet connections, or if you’re a larger organization with an IP subnet.
Dynamic IP Addresses / Dynamic DNS
If your Site has a dynamic IP address, which is common with consumer-grade internet connections, Dynamic DNS must be utilized to ensure DNSFilter always has the correct IP address for your network. If the IP address should change and Dynamic DNS is not utilized, it will result in DNS downtime, as DNSFilter does not serve DNS requests to unknown IP addresses for security reasons.
Step Two: Install Certificates#
When a user browses to a blocked site, the following page will display:

Because DNS Filter is intercepting the blocked site and displaying a different webpage, the browser will display a certificate mismatch error if the DNS Filter Root CA certificate is not installed on the computer.
Below we provide steps for manually installing the DNS Filter certificate, but you can use any method to deploy the certificate to your end user devices (GPO, MDM, etc).
Windows#
Assuming that the certificate was downloaded into the current user’s Download folder, you can run the following command in an administrative prompt to install it into the certificate store:
certutil -addstore -enterprise -f "Root" "C:\Users\%username%\Downloads\DNSFilter.cer"Firefox#
The Firefox browser utilizes it’s own certificate store by default. The best way to install for Firefox is simply to link it to the Windows Trust Store.
This can be done one of two ways:
- Navigate to
about:configin Firefox and setsecurity.enterprise_roots.enabledtotrue - Running the following command in an administrative command prompt. (Credit to Thomas Leister)
ECHO pref("security.enterprise_roots.enabled", true); > "C:\Program Files\Mozilla Firefox\defaults\pref\firefox-windows-truststore.js"
Deploy with PowerShell#
The following PowerShell script will download the certificate to the temp folder, and then install it to the system and enable Firefox to use the system certificate store. This is mostly for MSP’s who need to mass deploy the certificate with their RMM tool.
$url = 'https://app.dnsfilter.com/certs/DNSFilter.cer'

$File = "C:\Windows\Temp\DNSFilter.cer"

(New-Object System.Net.WebClient).DownloadFile($url, $file)

& certutil -addstore -enterprise -f "Root" $File

if(Test-Path "C:\Program Files\Mozilla Firefox\defaults\pref\") {Set-Content "C:\Program Files\Mozilla Firefox\defaults\pref\firefox-windows-truststore.js" "pref('security.enterprise_roots.enabled', true);"}MacOS#
- Download the SSL Certificate above.
- Run the following command in Terminal (requires Administrator “sudo” password): sudo /usr/bin/security add-trusted-cert -d -r trustRoot -p ssl -p basic -k /Library/Keychains/System.keychain ~/Downloads/NetAlerts.cer
This assumes the certificate is in the current user’s Downloads folder. Change pathname accordingly if the file is in another location.
The certificate is now installed and takes effect in the entire system and all browsers (except Firefox).
Firefox uses its own SSL “store”, and must be installed separately.
- In Firefox, go to:
-> Firefox (MacOS Menu)
--> Preferences…
-–> Privacy and Security (Left menu)
-—> View Certificates… (button, bottom/right)
-—-> Import…
-—–> Select downloaded NetAlerts.cer file - The certificate is now installed in Firefox.
Step Three: Test#
It is best practice to configure the DNS Filter DNS servers on one computer, in order to test policy settings and check for conflicts. After this test is successful, you can feel confident rolling out the change on your entire network.
Input the DNSFilter IPs listed below into your network adapter: You can make this change via the graphical user interface for your particular platform, or using the commands below:
Windows Powershell#
# Use below line for Wi-Fi adapter
Set-DnsClientServerAddress -InterfaceAlias Wi-Fi -ServerAddresses "103.247.36.36","103.247.37.37"

# Use below line for Ethernet adapter
Set-DnsClientServerAddress -InterfaceAlias Ethernet -ServerAddresses "103.247.36.36","103.247.37.37"

# Confirm change with
Get-NetIPConfiguration
Mac OSX Terminal#
# Use below line for Wi-Fi adapter
networksetup -setdnsservers Wi-Fi 103.247.36.36 103.247.37.37

# Use below line for Ethernet adapter
networksetup -setdnsservers Ethernet 103.247.36.36 103.247.37.37

# Confirm change with
scutil --dns | grep nameserver
Linux Terminal#
# Backup current resolv.conf
sudo cp /etc/resolv.conf /etc/resolv.conf.bak

# Set DNSFilter nameservers
echo -e "nameserver 103.247.36.36\nnameserver 103.247.37.37" | sudo tee /etc/resolv.conf
Testing in the Browser#
Now that the DNS addresses have been set, you can perform a test of your filtering policy to make sure that everything is working correctly. We recommend that you try the following in your browser:
- Verify your policy is active and filtering your desired categories, by visiting debug.dnsfilter.com
- Attempt to browse to a well-known domain that is allowed by your policy (i.e. google.com)
Use Incognito Mode
If you have visited a website 5-15 minutes prior to blocking it in your policy, you may notice that you are able to visit the site even after it is blocked. This is because the page has already been loaded into your browser cache. Therefore, it is more effective to run initial tests in incognito-mode so that you can eliminate this dynamic. Policy updates take place globally across our servers in < 1 second, so this is only a temporary issue caused by visiting a site just prior to blocking it.
If everything is working as expected, you are now ready to deploy DNSFilter on your entire network.
Step Four: Configure Your Network#
Configure DNSFilter on Your Firewall#
Hardware firewalls / virtual appliances can be configured to forward DNS queries to DNSFilter, regardless of what network clients have set on their network adapters. This is useful in scenarios where users are likely to attempt circumventing the filtering, by changing the DNS settings on their device. It is also useful if your Internet Service Provider is running a transparent proxy (redirecting DNS queries to their servers) because you can forward queries to port 5353.
Use Cases:
- School networks
- ISP has a transparent proxy
- Locations where users have access to change their DNS settings
In order to set this on your firewall, you’ll create either a NAT rule or port-forwarding rule to set all UDP and TCP port 53 traffic to DNSFilter’s Anycast IPs. You can check the Preventing Circumvention and Transparent Proxying articles for example of firewall rules that can be set.
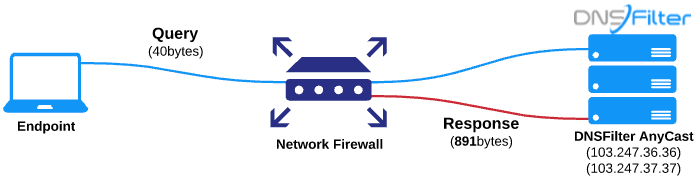
Check packet size
The DNS protocol originally had a 512-byte maximum packet size. Modern usage of the DNS protocol can sometimes require a packet size up to 4096 bytes. If the firewall is set to block/drop DNS packets less than 4096 bytes, this could result in DNS timeouts. Please check your firewall ruleset to be sure.
Configure DNSFilter on Your Router#
Setting DNSFilter servers on the router is a common setup for smaller locations, such as in a small office/home office (SOHO). This configuration uses the router as a DNS forwarder. Queries from network clients go to the router for resolution. The router then sends WAN queries through the network gateway to DNSFilter.
Use Cases:
- Home / Personal
- Small Offices
- No Local Authentication (Active Directory, LDAP, Radius, etc)

Due to the variety of router manufacturers in existence, DNSFilter does not provide directions for this procedure. You should easily be able to find this by searching Google for the instruction manual for your particular make and model of router. You will look to add the DNSFilter Anycast IPs into the DNS forwarding section of your router’s configuration.