Guide to DMARC, DKIM, and SPF
This article aims to provide a complete guide to implementing SPF, DKIM, and DMARC for your organization, and suggest the best practices for doing so. It is written in hopes that this will clear up confusion about what steps to take to achieve an effective DMARC deployment to secure business email and improve email deliverability.
A quick rundown on benefits of implementing SPF, DKIM, and DMARC:
- stops email spoofing/phishing from your domain;
- provides important information about the emails you sent, which can be used get all legitimate emails properly authenticated;
- improves sender reputation and email deliverability; your legitimate emails are more likely to reach the inbox.
Target audience: marketers, brand owners, domain owners, domain administrators, IT administrators, etc. and anyone who wants to prevent attackers from sending malicious emails using their domains.
What is email spoofing/phishing? #
Email spoofing is the forgery of an email header so that the message appears to have originated from someone or somewhere other than the actual source. The goal of email spoofing often is to fraudulently obtain the recipient’s sensitive information like credit card details and/or password.
Such an email often comes with a scary message warning the recipient some security breach has occurred and prompting him to take immediate action. Seeing that the From address is, for example, support@trustedbank.com, which is a forged email address, the recipient then clicks a link in the email, and is taken to a malicious website masquerading as the bank’s official web portal, and enters his credentials. The malicious website can then use the credentials and withdraw money from his bank account, inflicting financial loss upon the victim.
Or, the spoofed email could appear to be coming from one of the victim company’s partners, while in fact, it’s sent by the attacker. The email sends an invoice to the recipient requesting for payment. And again, the recipient is redirected to a fake website and pays the invoice, without knowing that he is wiring money to the attacker, instead of the intended partner.
What’s more, fraudsters can pretend to be the senior management officers of victim companies, and send out fictitious emails to the staff (such as accounting officers or managers), claiming that there is a need to transfer money to overseas business partners or make business investments, and direct the staff to transfer funds of the company to the bank accounts designated by the fraudsters.
Phishing remains a rampant security issue and is rising rapidly. Phishing attacks doubled in 2018, according to a report published by Kaspersky Lab.
Spoofed emails can also spread malware and/or ransomware, in which case, opening attachments from a spoofed email can spell disaster for your organization. A phishing-ransomware attack starts as a malicious email spoofed as coming from a trusted source. Once the recipient opens the email, he is asked to download the attachments in the email for important data. If he is deceived into doing so, the ransomware springs into action and encrypts the data on his device or completely locks him out. In some large scale ransomware attacks, the whole company’s network and the devices connected to it can be held up for ransom. According to a report, 93% of all phishing emails contain encryption ransomware.
Consequences of email phishing attacks #
Email spoofing/phishing is relatively easy and doesn’t require much technical know-how. Anyone familiar with basic email server admin skills can do this and it comes with a high ROI.
Nowadays many companies still rely on spam filtering techniques to stop these attacks - but if a carefully crafted phishing email doesn’t trigger the spam filters and can pass without being detected. Spam filtering measures aren’t exactly designed to stop spoofing after all. You need another defense mechanism specifically designed to prevent phishing emails from ever reaching the recipients.
When a company falls victim to an email phishing attack, a lot of things are suddenly at risk: blemished brand reputation, intellectual property stolen, direct financial loss, suspension of business activity due to the company being held up, etc. The list goes on.
Email is one of the most important assets of modern organizations. Critical corporate functions including marketing, sales, customer support, internal communication depend on email heavily, and any security breach can cause severe losses. Failing to secure your corporate email is like keeping a safe unlocked or a corporate bank account unprotected by a password, thus vulnerable to all sorts of attacks.
How to stop email spoofing/phishing? #
While the reality of rampant email spoofing attacks might seem scary to some, the good news is: you can prevent or block email spoofing/phishing by implementing email authentication with modern email security measures, namely SPF, DKIM, and DMARC. These are 3 protocols that serve as the holy trinity of email authentication, and when deployed correctly, they can put a complete stop to email spoofing attacks.
On the highest level, an SPF/DKIM/DMARC implementation works by publishing DNS records for the domain to be secured, and together with email service providers (ESP) like Gmail, it prevents unauthorized attackers from delivering spoofing emails using your domain.
In this DMARC guide, we’ll explain what SPF, DKIM, and DMARC are, how each of them works on its own, and together, how they can protect your business email from spoofing attacks.
Introduction to SPF #
What is SPF? #
The first player in the modern email authentication trio is Sender Policy Framework (SPF), which first appeared in the early 2000s.
SPF is an email authentication mechanism which allows only authorized senders to send on behalf of a domain, and prevents all unauthorized users from doing so. SPF enables the receiving email server to check that an email claiming to come from a specific domain indeed comes from an IP address authorized by that domain’s administrator.
SPF is defined in RFC 7208, and more information can be found at www.openspf.org.
How SPF works #
In order to facilitate our discussion, let’s assume this setup:
- your business domain is business.com; you will send emails to your employees and customers from
support@business.com; - your email delivery server, which sends the email for you, has an IP address of
192.168.0.1; - some attacker uses a scam email server at IP address
1.2.3.4to try to send spoofed emails.
When an email delivery service connects to the email server serving up the recipient’s mailbox:
- the email server extracts the domain name from the envelope from address; in this case, it’s
business.com; - the email server checks the connecting host’s IP address to see if it’s listed in
business.com’s SPF record published in the DNS. If the IP address is listed, the SPF check passes, otherwise not.
For example, let’s say your SPF record looks like this:
v=spf1 ip4:192.168.0.1 -allit means only emails from IP address 192.168.0.1 can pass SPF check, while all emails from any IP address other than 192.168.0.1 will fail. Therefore, no email from the scam server at IP address of 1.2.3.4 will ever pass SPF check.
Think of the SPF record as a whitelist of legitimate IP addresses, and only when an incoming email is from one of the IP addresses, SPF gives the green light. No other hosts are able to send emails using your domain. The SPF authentication result is then used for DMARC authentication later.
Creating an SPF record #
SPF provides mechanisms, qualifiers, and modifiers to allow domain administrators to specify IP addresses in a highly flexible way.
Let’s revisit the SPF record:
v=spf1 ip4:192.168.0.1 -allv=spf1 defines the version of SPF. Currently, it’s always “spf1”. Everything that comes after is combinations of mechanisms, qualifiers, and/or modifiers which specify if a host is eligible to send emails.
The ip4 mechanism specifies an IPv4 address range allowed to send emails for the domain. In this case, a single IP address 192.168.0.1 is allowed.
The -all part at the end specifies that if none of the previous mechanisms matches, the SPF check fails. -all consists of the - qualifier and the all mechanism, which I will explain below.
SPF mechanisms#
A mechanism is a way to specify a range of IP addresses. Eight mechanisms are defined:
IP4: If the sender is in a given IPv4 address range, match;IP6: If the sender is in a given IPv6 address range, match:A: If the domain name has an address record (A or AAAA) that can be resolved to the sender’s address, it will match;MX: If the domain name has an MX record resolving to the sender’s address, it will match (i.e. the mail comes from one of the domain’s incoming mail servers);PTR: If the domain name (PTR record) for the client’s address is in the given domain and that domain name resolves to the client’s address (forward-confirmed reverse DNS), match. This mechanism is deprecated and should no longer be used;EXISTS: If the given domain name resolves to any address, match (no matter the address it resolves to). This is rarely used. Along with the SPF macro language it offers more complex matches like DNSBL-queries;INCLUDE: References the policy of another domain. If that domain’s policy passes, this mechanism passes. However, if the included policy fails, processing continues. To fully delegate to another domain’s policy, the redirect extension must be used;ALL: Matches always; used for a default result like -all for all IPs not matched by prior mechanisms.
SPF qualifiers#
A qualifier specifies the result of a mechanism evaluation. Each qualifier can be combined with any of the mechanisms described above.
+for PASS, i.e., the SPF check passes. This can be omitted; e.g.,+mxis the same as mx;?for a NEUTRAL result interpreted like NONE (no policy);~(tilde) for SOFTFAIL, a debugging aid between NEUTRAL and FAIL. Typically, messages that return a SOFTFAIL are accepted but tagged;-for FAIL, i.e., the SPF check fails.
SPF modifiers#
There are two widely deployed modifiers:
exp=some.example.comgives the name of a domain with a DNS TXT record (interpreted using SPF’s macro language) to get an explanation for FAIL results. Rarely used.redirect=some.example.comcan be used instead of theallmechanism to link to the policy record of another domain.
SPF modifiers allow for future extensions to the framework.
Note that redirect works in a different way than include:
includeis a mechanism, and if it fails validation, the next mechanism in the same SPF record will be checked;redirectis a modifier, and the result is the entirely based on the evaluation of the specified domain’s SPF record.
Example SPF records#
I have prepared a generic SPF record for you as a starting point. You can modify it to suit your needs.
v=spf1 a mx include:_spf.example.com -allThis record allows the following IP addresses to send emails on behalf of your domain business.com:
- if
business.comhas an address record (A or AAAA) that can be resolved, the resolved value is allowed (theamechanism); - if
business.comhas an MX record that can be resolved, the resolved value is allowed (themxmechanism); - any IP address passing SPF authentication using another domain’s SPF record at
_spf.example.com, is allowed (theinclude:_spf.example.commechanism);
Note that if you use 3rd-party email delivery services, they usually ask you to add their SPF list to your SPF record using the include mechanism. For example, SendGrid will ask you to add include:sendgrid.net to your SPF record, so that email messages sent from SendGrid will pass SPF authentication.
A special SPF record that prevents any email from being sent on behalf of a domain looks like this:
v=spf1 -allThis record dictates that no IP address be authorized to send emails for the domain.
You should publish the SPF record on domains that are not supposed to send any emails, including parked domains. Otherwise they are wide open to spoofing attack, and will ultimately suffer deteriorated domain reputation and email deliverability, should you decide to use it to send emails later.
Take-away: the important thing here is that you must include all IPs that will send emails for your business; otherwise, emails sent from some of the IPs will fail SPF authentication.
Learn more about SPF records here.
Publishing an SPF record #
Once you’ve created the SPF record, you need to publish it to the DNS before the receiving email server can pick it up. Publishing an SPF record is a matter of creating a TXT record on your domain.
Let’s assume you are using GoDaddy as your domain hosting service. If you are using another domain hosting service, the UI should be similar.
Here are the steps:
Log in to GoDaddy. Click the domain in question, then click the DNS button.

If you’ve never created an SPF record on the domain before, click the Add button under the Records section.
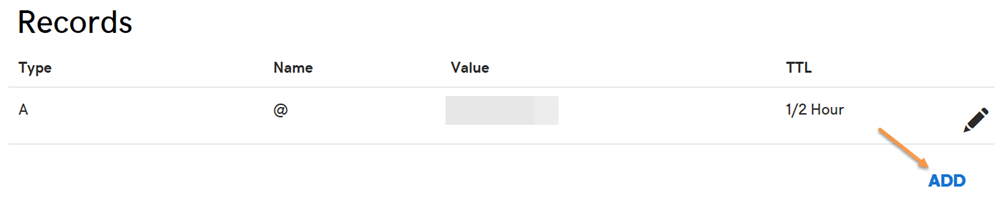
Otherwise you already have an existing SPF record, edit it instead. To check if there is any SPF record, try to find a TXT record with a value starting with
v=spf1.Select TXT for the Type drop-down menu. Enter @ for the Host field. Enter the SPF record as the TXT Value. Then click the Save button.
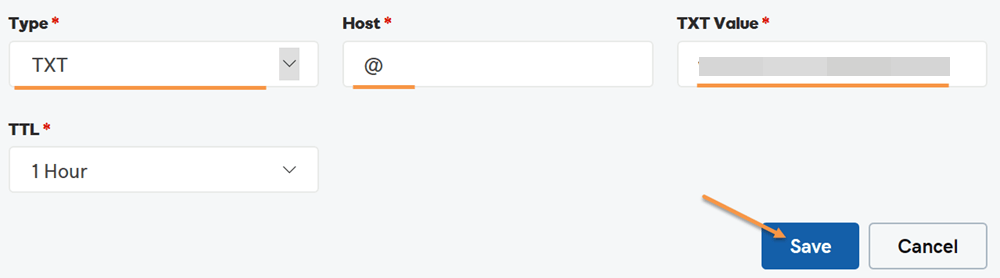
Now you have published the SPF record. Note that if you check the newly published SPF record, it might take up to 1 hour before it appears in whatever tool you use to check it, due to DNS propagation.
SPF DNS lookup limit #
Each time an email message hits the email service host, the host looks up in the DNS to perform SPF check. Care has been taken to prevent this from turning into Denial of Service (DoS) attack.
The SPF specification imposes that the number of mechanisms and modifiers that do DNS lookups must not exceed ten per SPF check, including any lookups caused by the use of the “include” mechanism or the “redirect” modifier. If this number is exceeded during a check, a PermError is returned.
The include, a, mx, ptr, and exists mechanisms as well as the redirect modifier do count against this limit. The all, ip4, and ip6 mechanisms do not require DNS lookups and therefore do not count against this limit. The exp modifier does not count against this limit because the DNS lookup to fetch the explanation string occurs after the SPF record has been evaluated.
For example, let’s take a look at google.com’s SPF record:
v=spf1 include:_spf.google.com ~allthe include mechanism in this record count 1 against the limit. Next is _spf.google.com’s SPF record:
v=spf1 include:_netblocks.google.com include:_netblocks2.google.com include:_netblocks3.google.com ~allthe 3 include mechanisms in this record count 3 against the limit. All of the records below _netblocks.google.com _netblocks2.google.com _netblocks3.google.com resolve to a flat list of IP addresses. So none of them counts against the limit.
Therefore, the total number of mechanisms and modifiers that do DNS lookups in google.com’s SPF record is 4 (1+3)。
You can verify the above SPF record check result by using the SPF record checker on google.com.
What if your SPF record exceeds the 10-DNS-lookup limit? #
If your SPF record exceeds the 10-DNS-lookup limit, SPF authentication returns a permanent error indicating “too many DNS lookups”. An SPF permanent error is interpreted in DMARC as fail. Therefore, when this happens, it has a negative impact on your email deliverability.
I suggest that you use the SPF record checker to check the DNS lookup count of the SPF record on your domain to make sure it stays below 10. If the number goes beyond 10, you need to “flatten” your SPF record so that all your legitimate emails can land in the inbox as desired.
Manually flattening your SPF record is both error-prone and tedious, and it’s recommended to use a tool to automate this process. DMARCLY’s has a purpose-built feature called Safe SPF which full automates SPF record flattening.
For a more thorough discussion on this topic, refer to: SPF PermError: Too Many DNS Lookups - When SPF Record Exceeds 10-DNS-Lookup Limit
SPF tools #
You can use free online SPF tools for various tasks including generating an SPF record and checking an existing SPF record.
To generate an SPF record for your domain, go to SPF record generator. Supply the mechanisms and qualifier that fit your needs and hit the Generate SPF Record button. Now you have an SPF record ready to be published to the DNS.
To check the SPF record on your domain, go to SPF record checker. Simply enter the domain in question, and it will fetch the SPF record (if any) from the DNS. After the record is returned, it:
- checks if the SPF record syntax is correct;
- makes sure the number of mechanisms and modifiers that do DNS lookups does not exceed ten;
- “flattens” the returned SPF record into a list of plain IP addresses, so that you can check them one by one, in case it’s necessary. This is helpful when you need to track down some gnarly SPF issues.
Here is an SPF record check example:
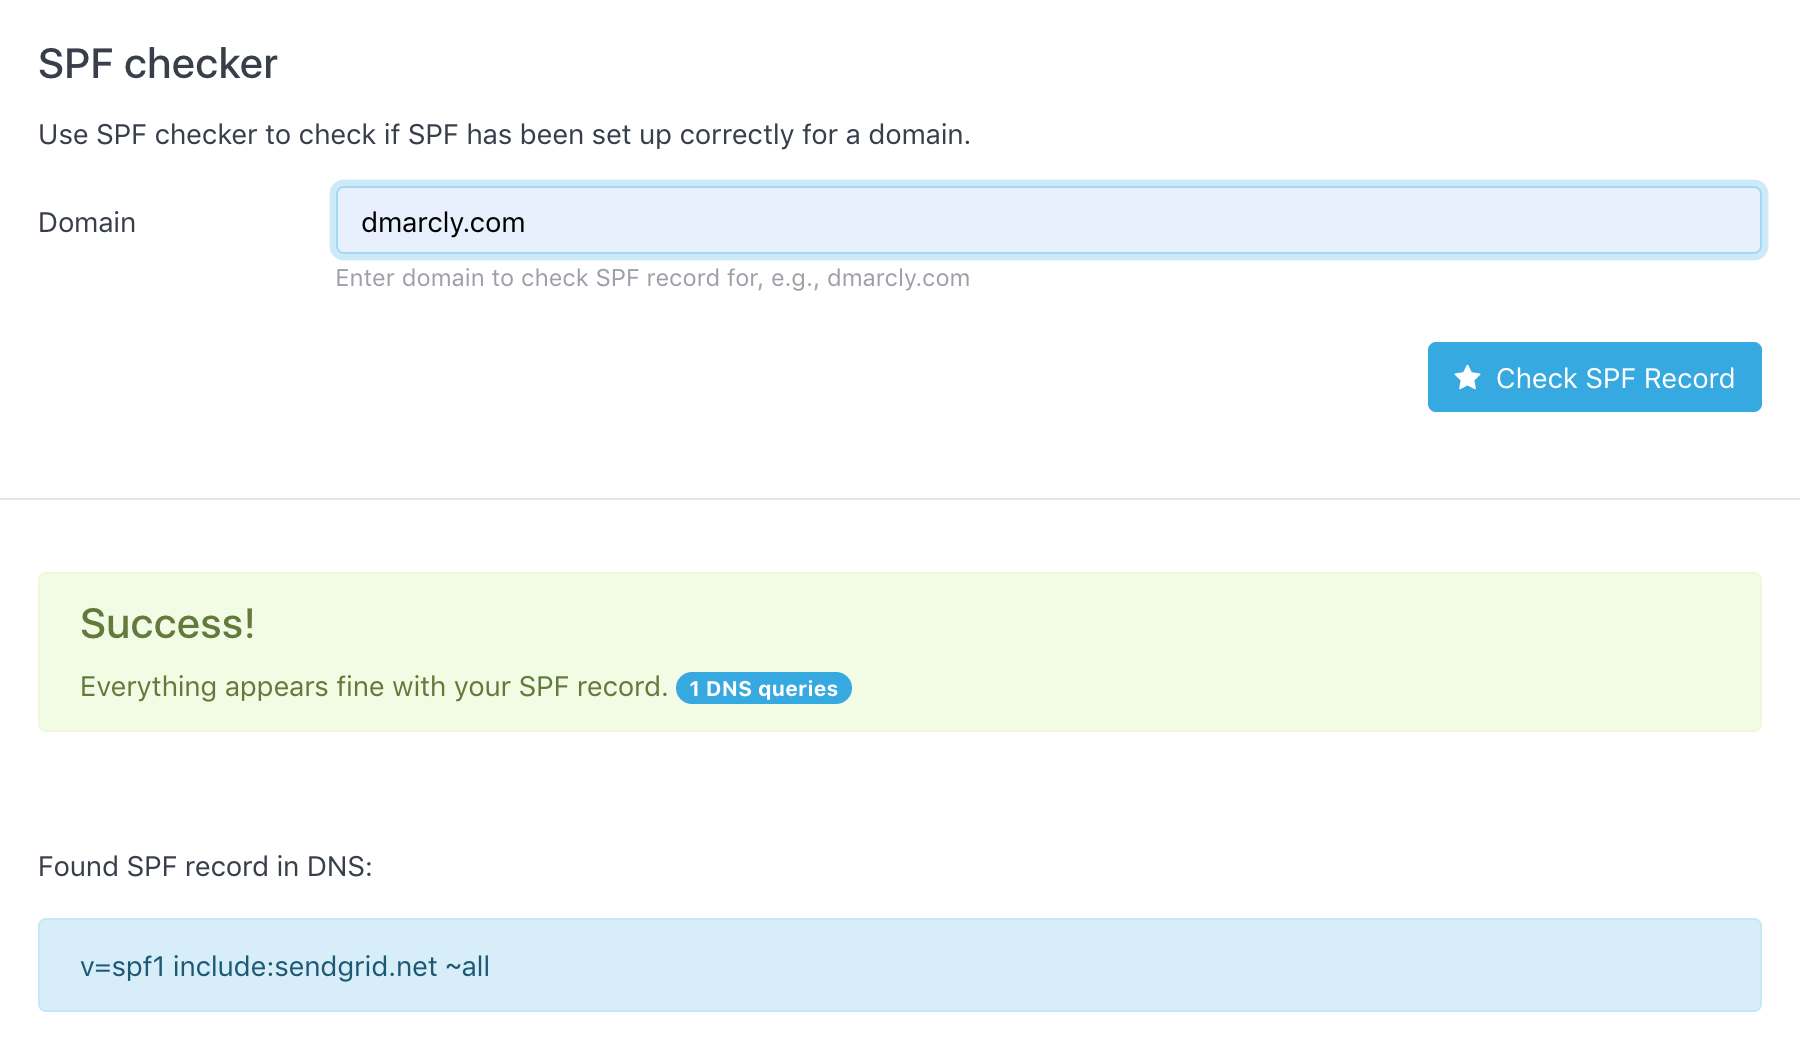
As can be seen from above, the SPF record test shows that the SPF setup on domain dmarcly.com is correct.
Notes on SPF #
When used in isolation, SPF has a few problems.
Remember the two from addresses which every email message has, the envelope from address and the header from address? What if they are different? Does SPF check both of them?
What actually happens might surprise you …
SPF only checks the envelope from address, which is quite a caveat. What about the header from address? No, SPF doesn’t check that, which means the header from address can still be spoofed.
This means if the end user sees a spoofed john@trustedbank.com instead of hacker@malicious.com in their email client, they might still fall victim to it. The header-from address is what end users usually perceive as the sender.
Worry not, though. DMARC has introduced the concept of identifier alignment to solve this problem. Basically what identifier alignment does is to ensure that envelope from address and header from address match, leaving no security hole for spoofers. We will discuss identifier alignment in detail in the DMARC section.
Another issue is that SPF breaks when an email message is forwarded. When the message is relayed by an intermediate server to reach the final receiving server, and the intermediate server’s IP address is not on the SPF whitelist, the SPF check fails. Such a case is not very common, though. Fortuntely, this can be fixed by DKIM which we will discuss below.
Introduction to DKIM #
What is DKIM? #
One important aspect of email security is the authenticity of the message. An email message usually goes through multiple servers before it reaches the destination. How do you know the email message you got is not tampered with somewhere in the journey?
For example, an email is sent from company 1 to company 2 requesting 1000 USD payment to company 1’s account. However, the email is altered by some hacker downstream so that the request becomes 100,000 USD to another account and, without extra security measures, it’s hard to detect such alterations.
DKIM comes to the rescue. DKIM, which stands for DomainKeys Identified Mail, is an email authentication method designed to detect forged header fields and content in emails. DKIM enables the receiver to check if email headers and content have been altered in transit.
I have found using an analogy between a postal envelope seal and a DKIM signature helps understand DKIM. Think of a DKIM signature in the email header sort of as an envelope seal: the sending server “seals” an email message on its way out by affixing a signature to the message; anyone who attempts to tamper with the email further in transit, must break the seal to do so, hence inevitably detectable by the email receiver.
DKIM is defined in RFC 6376, and more information can be found at www.dkim.org.
Asymmetric cryptography #
DKIM is based on asymmetric cryptography, which uses pairs of keys: private keys which are known only to the owner, and public keys which may be distributed widely.
One of the best-known uses of asymmetric cryptography is digital signatures, in which a message is signed with the sender’s private key and can be verified by anyone who has access to the sender’s public key. This ensures that the message has not been tampered with, as the signature is bound to the message, and verification will fail for practically any other message, no matter how similar to the original message.
How DKIM works #
On a high level, DKIM authentication consists of 2 components: signing and verification. A DKIM-enabled email server (signing server) signs an email message on its way out, using a private key which is part of a generated key pair. When the message arrives, the receiving server (verification server) checks if a DKIM-Signature field exists in the header, and if so, uses the DKIM public key in the DNS to validate the signature.
Depending on the outcome of the DKIM signature check on the receiving server, the email may or may not pass DKIM authentication. The DKIM authentication result is then used for DMARC authentication later.
In short, in order for DKIM to work:
- create a key pair containing both the private key and the public key;
- keep the private key with the signing server;
- publish the public key to the DNS in a DKIM record, so that the verification server has access to it.
DKIM selectors #
A DKIM selector is a string used by the outgoing server to locate the private key to sign the email message, and by the receiving server to locate the public key in the DNS to verify the integrity of the email message.
The outgoing server and the receiving server must use the same DKIM selector in order to use the same private/public key pair.
For more information about DKIM selectors, refer to: DKIM Selector Explained.
DKIM signing #
Signing an email message on the originating email server means:
- choose which header fields and/or body to be included in the data;
- compute the hash sum of the data, including message headers and message body;
- encrypt the hash sum with the private key. The result is called the “signature”;
- append a DKIM-Signature header containing the signature to the email.
DKIM verification #
When the email reaches the destination, the receiver checks if a DKIM-Signature field exists in the header.
Here is an example DKIM-Signature header field revealed in Gmail:

As you can see above, the highlighted b= tag contains the signature. We will examine each of the tags in a DKIM signature below.
If a DKIM-signature field is found, the server verifies the authenticity of the email:
look up the DKIM record of the domain in the DNS, using the selector in DKIM-Signature specified by the
s=tag;if found, extract the public key which is part of the key pair from the record; here is an example DKIM record retrieved by a receiving server:

As shown above, the value in the
p=tag contains the DKIM public key;compute a hash sum using the algorithm specified by the
a=tag, of the incoming data specified by theh=tag;decrypt the signature with the public key to reveal the hash sum computed by the sender;
if hash sum in 4 is equal to hash sum in 3, it passes the check, meaning the message hasn’t been tampered with; otherwise it fails.
Note that the verification part only checks the header fields and/or body chosen in the signing part - all the elements must remain the same, otherwise authentication fails. On the other hand, no change in non-chosen elements causes DKIM authentication to fail.
Tags in DKIM-signature #
The DKIM-signature header field in an email message header consists of a list of tag=value parts. An example DKIM-signature header field looks like this:
DKIM-Signature: v=1; a=rsa-sha256; d=example.net; s=brisbane;
     c=relaxed/simple; q=dns/txt; t=1117574938; x=1118006938;
     h=from:to:subject:date:keywords:keywords;
     bh=MTIzNDU2Nzg5MDEyMzQ1Njc4OTAxMjM0NTY3ODkwMTI=;
     b=dzdVyOfAKCdLXdJOc9G2q8LoXSlEniSbav+yuU4zGeeruD00lszZVoG4ZHRNiYzR
Here are the tags that can appear in a DKIM-signature header field:
v: version;a: signing algorithm;d: domain;s: selector;c: canonicalization algorithm(s) for header and body;q: default query method;t: signature timestamp;x: expire time;h: header fields - list of those that have been signed;bh: body hash;b: signature of headers and body.
Tags in DKIM DNS record #
A DKIM record published in the DNS consists of a list of tag=value parts. An example DKIM DNS record looks like this:
v=DKIM1; k=rsa; t=s; p=MIGfMA0GCSqGSIb3DQEBAQUAA4GNADCBiQKBgQCnVgd0NyrRE261IIiPqi+0H1baNyKcdj8Kea/VlSP4exzvKx8pJ01EWMwd094FV/6OCBIf7KGKgowMnWl3tW3Z5G++uZHkdgF+6xg7b9PynmX/NTo2kx92hlGgegwyulF5B7d2FM0doaCeoO4rD05jZzwi3cXx/156Gg9Xwd/Z/QIDAQABHere are the tags that can appear in a DKIM DNS record:
v: version; must be “DKIM1”;g: granularity;h: a list of mechanisms that can be used to produce a digest of message data;n: notes that might be of interest to a human;s: a list of service types to which this selector may apply;q: a list of query methods;l: body length limits;k: a list of mechanisms that can be used to decode a DKIM signature;t: a list of flags to modify interpretation of the selector;p: base64 encoded public key.
Creating a DKIM record #
If you are using a 3rd-party email delivery service, creating a DKIM record is easy enough: simply use their service to create the private/public key pair which will be kept with their service. I am going to show you exactly how to do this in SendGrid now:
log in to SendGrid’ dashboard;
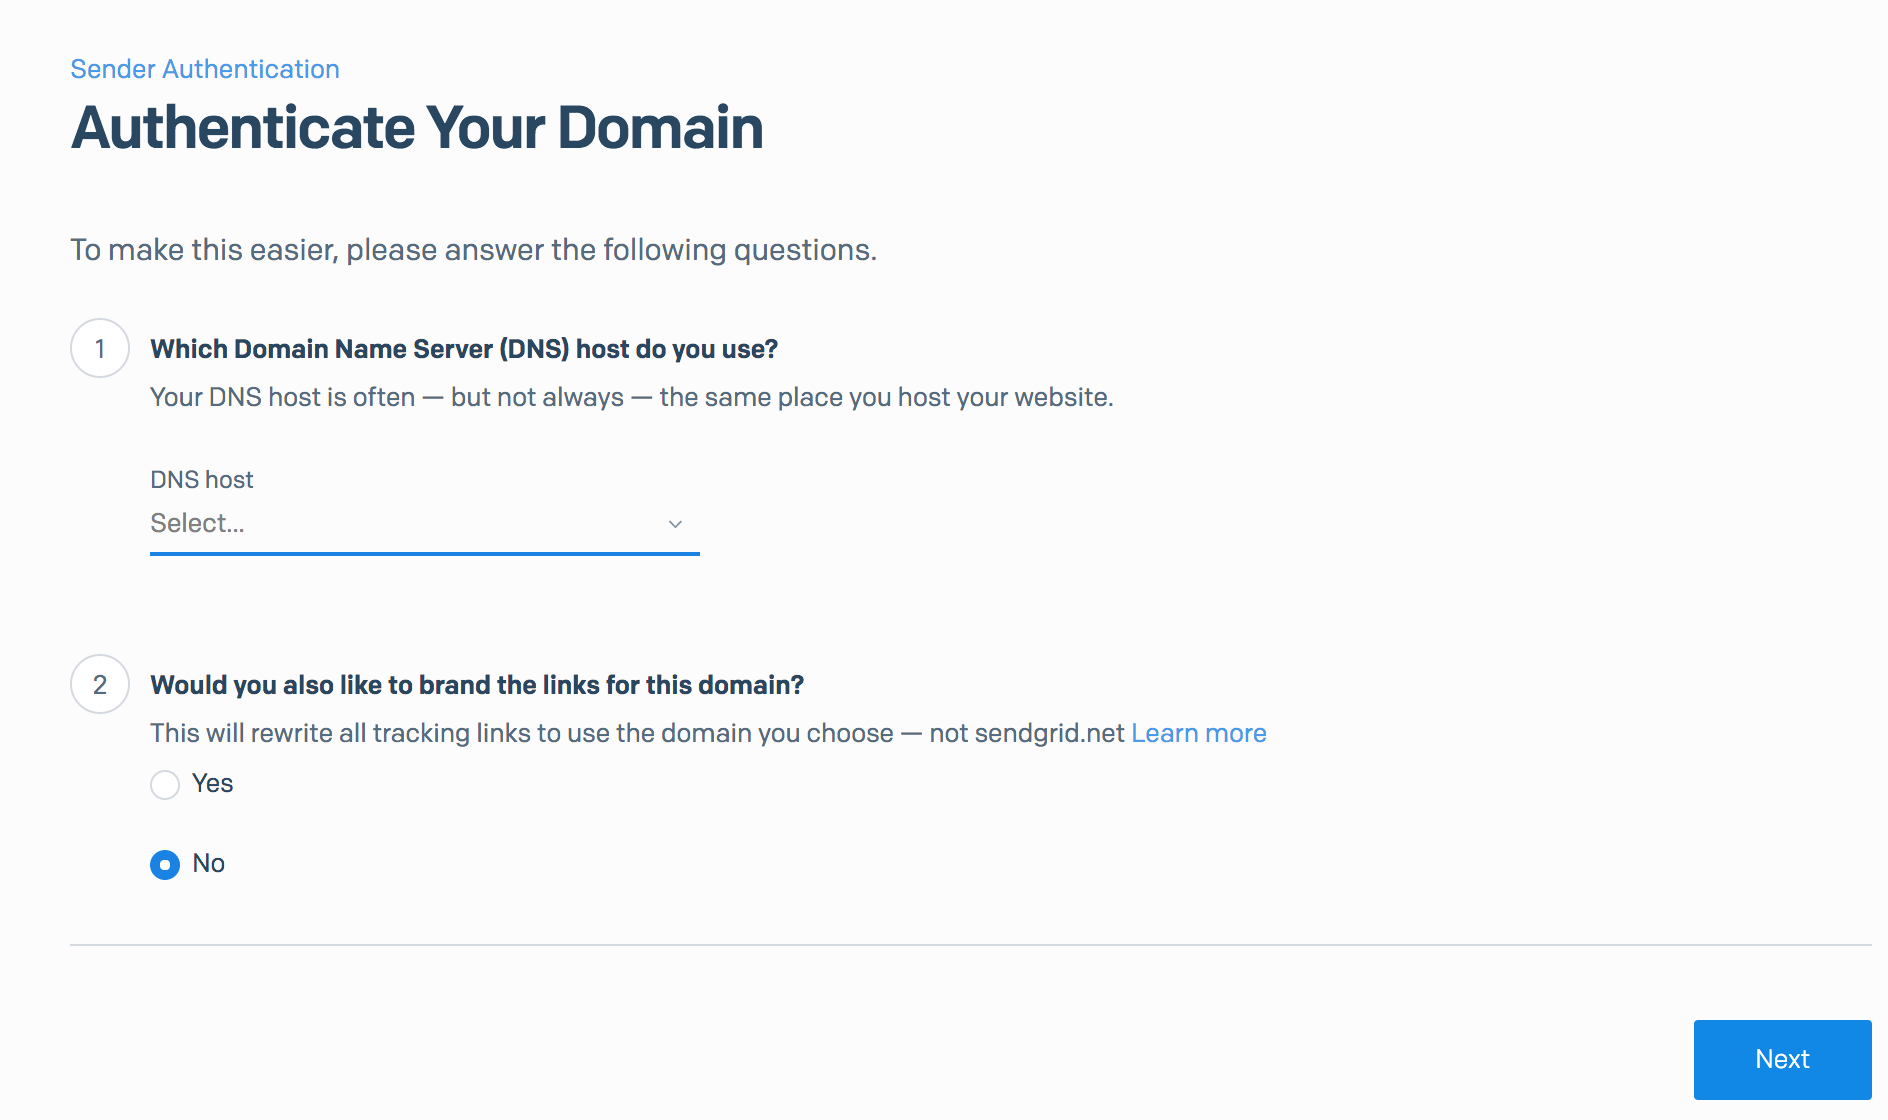
go to Settings/Sender Authentication/Authenticate Your Domain, choose your DNS host and click the Next button.
enter the domain you want to authenticate (we are using
example.com), and click the Next button.
now SendGrid has created 2 DKIM records for you, using selectors
s1ands2respectively, as highlighted below: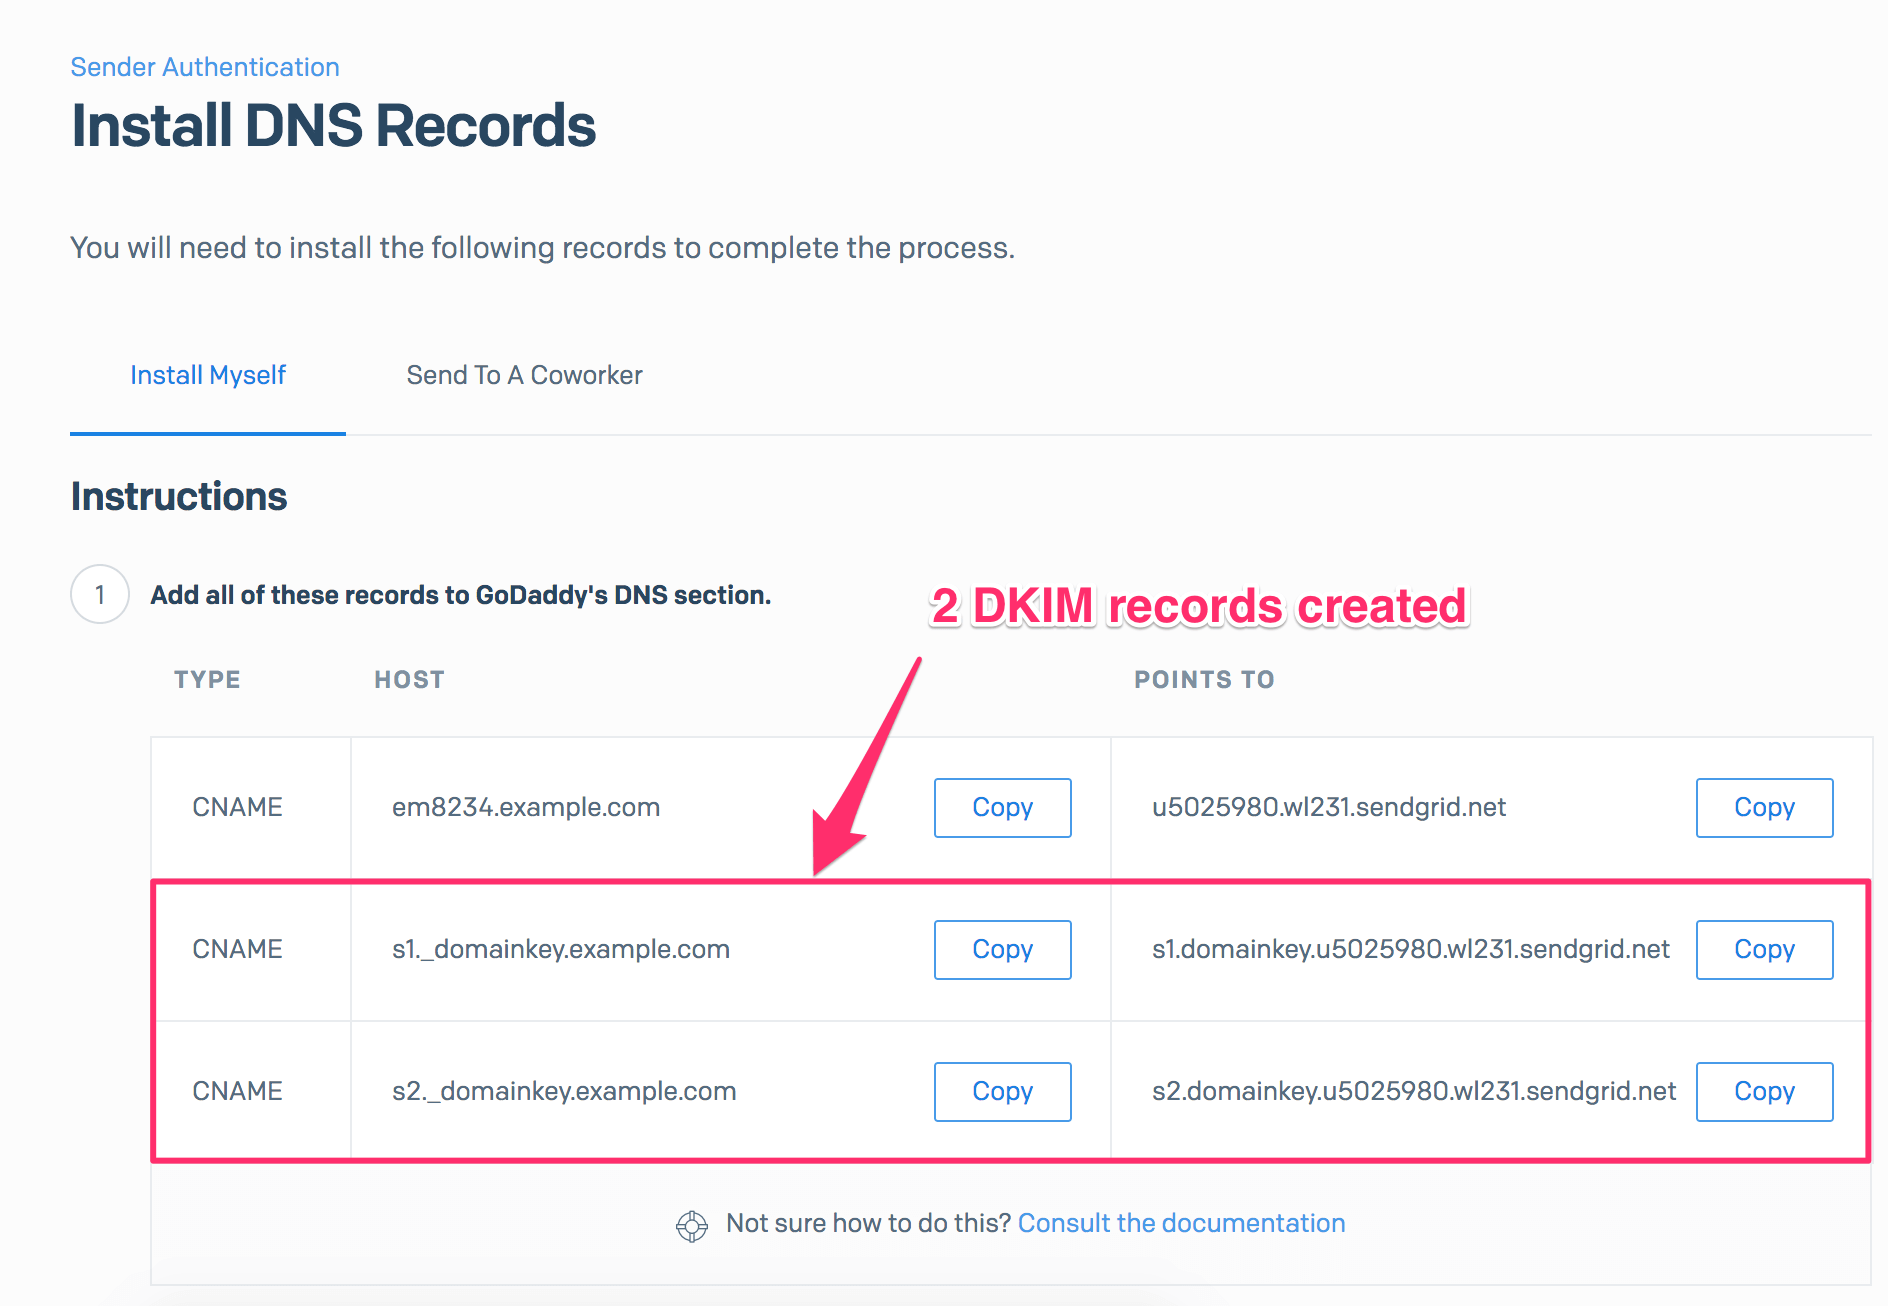
As you can see, there is no private key/public key management on your end - SendGrid manages all this for you! All you have to do is to publish these 2 DKIM records for your domain in DNS. Another reason to outsource email delivery to a 3rd-party service!
Depending on the email delivery service you are using, the DKIM record that they generate can be either:
a TXT record that looks like this:
textv=DKIM1; k=rsa; t=s; p=MIGfMA0GCSqGSIb3DQEBAQUAA4GNADCBiQKBgQCnVgd0NyrRE261IIiPqi+0H1baNyKcdj8Kea/VlSP4exzvKx8pJ01EWMwd094FV/6OCBIf7KGKgowMnWl3tW3Z5G++uZHkdgF+6xg7b9PynmX/NTo2kx92hlGgegwyulF5B7d2FM0doaCeoO4rD05jZzwi3cXx/156Gg9Xwd/Z/QIDAQABor a CNAME record that looks like this:
texts1.domainkey.u5021280.wl331.sendgrid.netFor example, SendGrid creates CNAME records when you set up DKIM with them.
Either way, you need to publish it to the DNS accordingly.
You might have noticed that SendGrid has created 2 DKIM records, rather than 1. This has something to do with DKIM key rotation, explained below.
Publishing a DKIM record #
Before an email receiver can authenticate your domain using DKIM, you need to publish it to the DNS first, since the receiver queries the DNS for DKIM records.
Publishing a DKIM record is just creating a CNAME record on (selector)._domainkey.example.com. I will show you how to do this in GoDaddy step by step:
Log in to GoDaddy. Click the domain in question, then click the DNS button.
If the DKIM record doesn’t exist on the domain, click the Add button under the Records section.
Otherwise edit it instead. To check if the DKIM record already exists, look for any CNAME record that looks like
(selector)._domainkey.Select CNAME for the Type drop-down menu. Enter
s1._domainkeyfor the Host field, wheres1is the selector. Enter thePOINTS TOvalue you obtain from SendGrid in Step 4 in the Creating a DKIM record section, for the Points to field. Then click the Save button.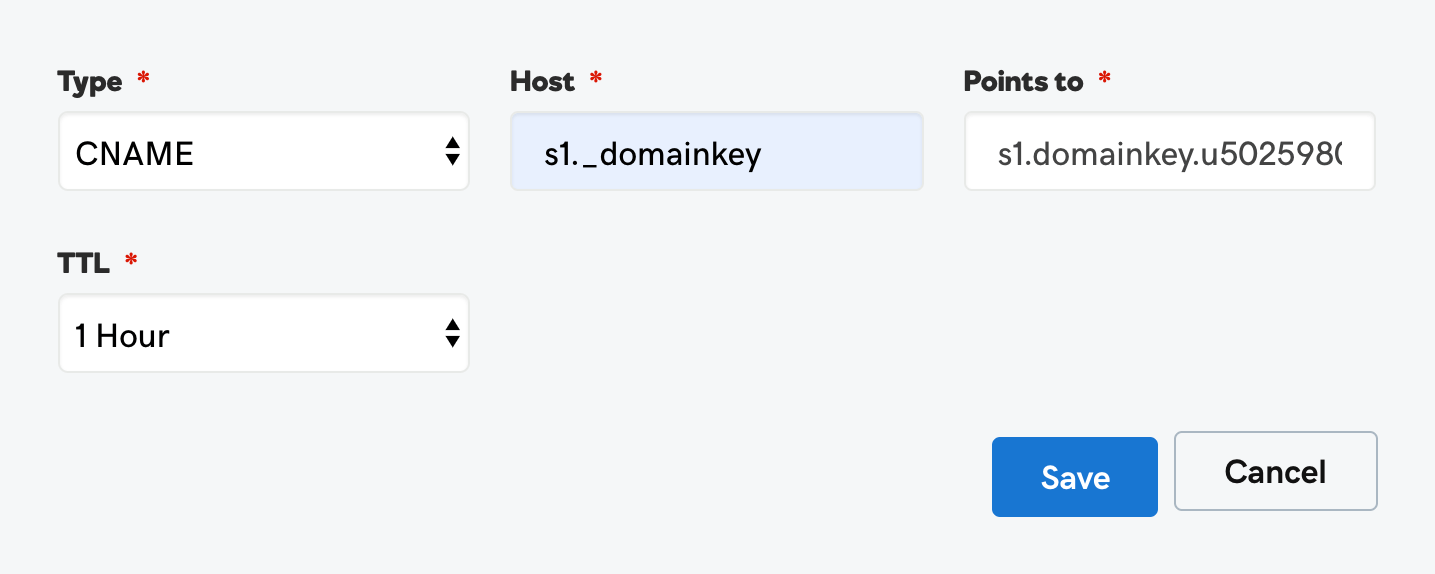
Note in the last section, SendGrid created 2 DKIM records for us. We must publish both of them. So repeat the steps above for the other DKIM record.
DKIM key rotation #
DKIM has proven to be a highly effective means by which a receiver can verify that the signed fields of an email have not been modified in transit. DKIM is as secure as the weakest link - the private key, though. The private key of a DKIM key pair is vulnerable to being stolen if an attacker is able to compromise the system in which it is stored. Therefore, to minimize the risk of active DKIM keys being compromised, they should be changed frequently. This is a practice known as key rotation.
Note that manual DKIM key rotation is necessary only if you run your own email delivery service in-house. If you are using services like SendGrid, Office 365, or Google Apps to deliver emails, you don’t have to do anything - DKIM key rotation is done automatically for you.
DKIM tools #
You can use free online DKIM tools for various tasks including generating a DKIM record and checking an existing DKIM record.
To generate a DKIM record for your domain, go to DKIM record generator. Supply your domain and selector and hit the Generate DKIM Record button. The tool will generate a private key which you can store on your email server, and a DKIM record ready to be published in the DNS.
To check if DKIM has been set up for your domain, go to DKIM record checker. Simply enter the domain in question and the selector, and it will return the DKIM record on selector._domainkey.domain, if any. It also checks if the DKIM record syntax is correct.
Here is an example DKIM record set up on s1._domainkey.dmarcly.com:
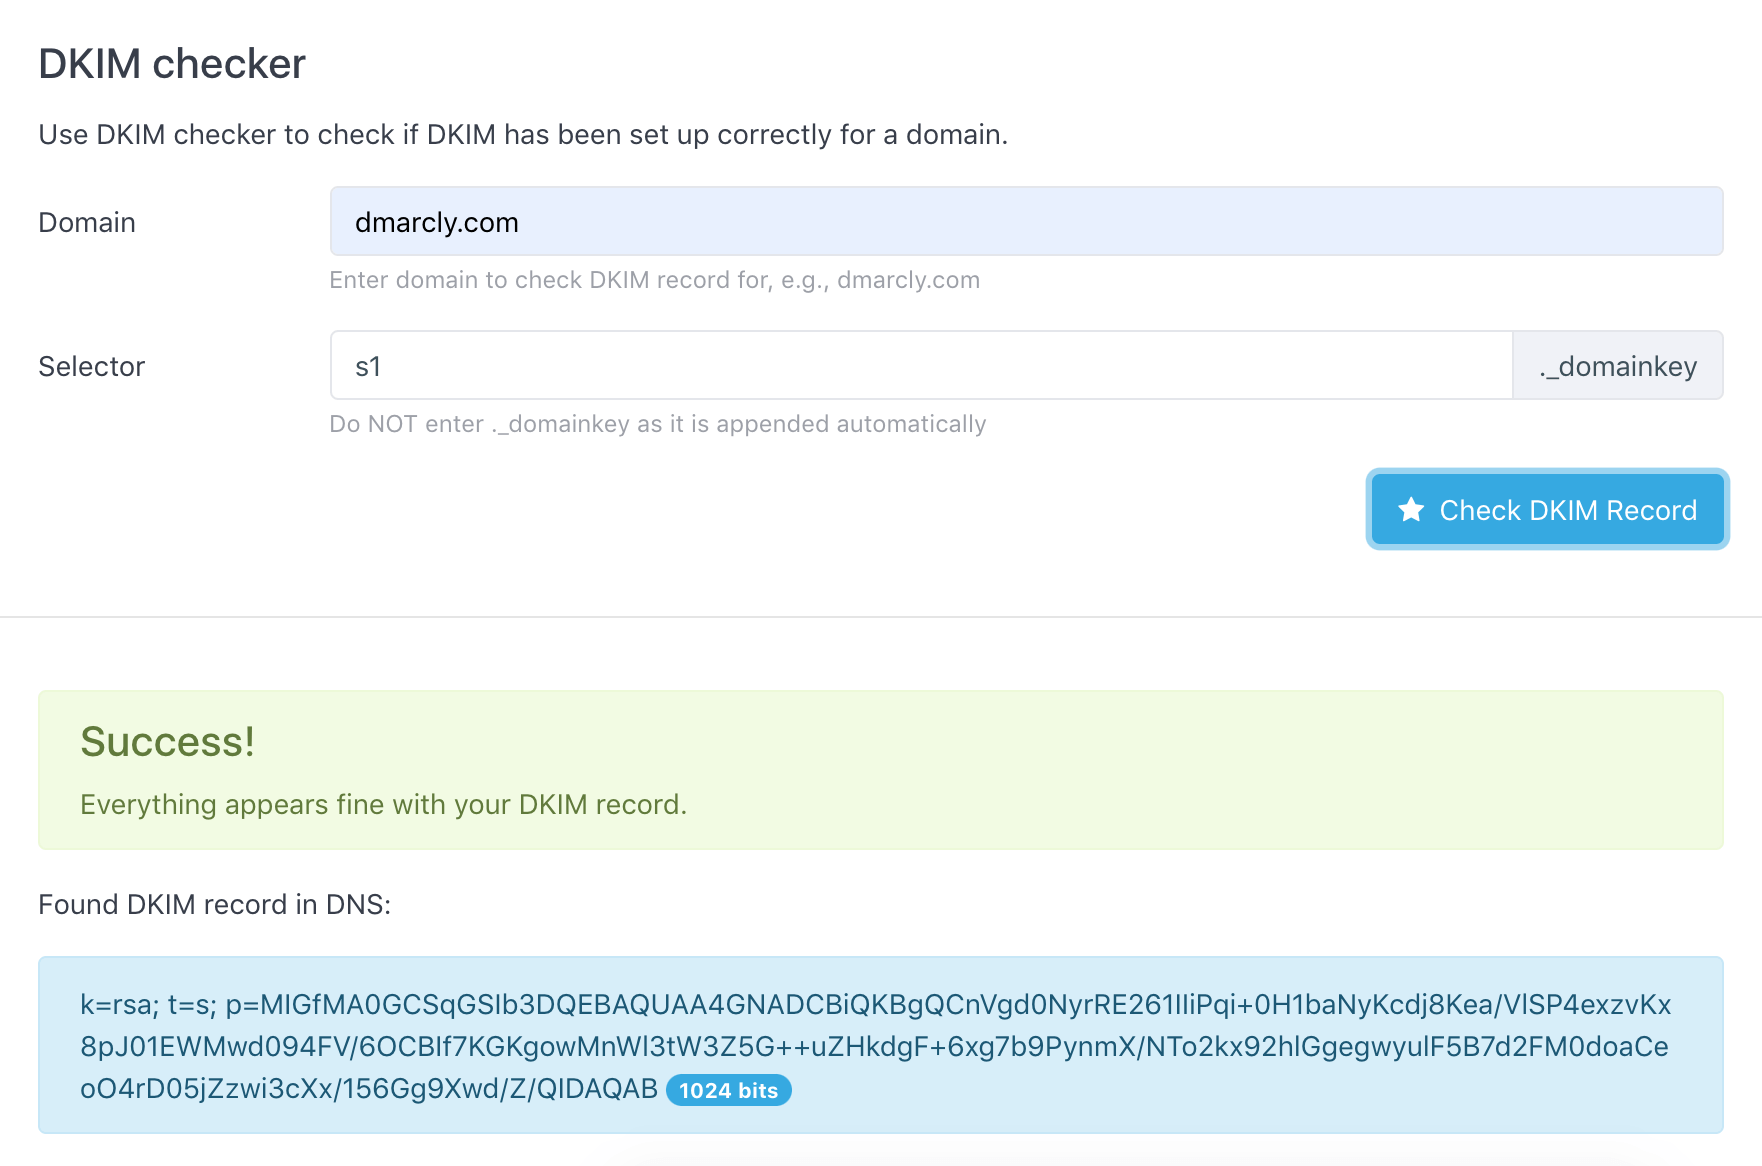
As can be seen from above, the DKIM test shows that the DKIM setup on domain dmarcly.com is correct.
The table below shows what each tag possibly found in a DKIM record means:
v: DKIM protocol version. “DKIM1” by default;g: Some organizations assign specific business functions to discrete groups, inside or outside the organization. This key is to authorize that group to sign some mail, but to constrain what signatures they can generate. The DKIM granularity (theg=tag) facilitate this kind of restricted authorization;h: Provides a list of mechanisms that can be used to produce a digest of message data. (‘sha1’ or ‘sha256’ can be used);n: Notes that might be of interest to a human;s: Provides a list of service types to which this selector may apply. (’*’ and ’email’ are used most often);q: Provides for a list of query methods. (‘dns’ is used most often);l: Body length limits (in the form of the ’l=’ tag) are subject to several potential attacks;k: Provides a list of mechanisms that can be used to decode a DKIM signature. (‘rsa’ is used most often);t: Provides a list of flags to modify the interpretation of the selector. These DKIM Selector Flags for additional flags are optional. (‘y’ and ’s’ are often used);p: Base64 encoded public key.
Notes on DKIM #
Unlike SPF which breaks down when an email message is forwarded, DKIM signatures survive email forwarding. This is because the DKIM signature is part of the message header, rather than the SMTP envelope, and only the latter is changed when the email message is forwarded.
DKIM has a caveat though: it doesn’t require the d= value in DKIM-signature to match the header from domain, which end users rely on to tell where the email is from. A spoofer can inject a valid DKIM-signature in an email with a d= value that points to a domain controlled by the spoofer, allowing DKIM to pass while still spoofing the from address visible to the user.
Fortunately, this can be fixed by DMARC identifier alignment. DMARC identifier alignment can ensure that the d= value in DKIM-signature is the same as the header from domain in order for it to pass DMARC authentication. We will discuss identifier alignment in detail in the DMARC section.
Introduction to DMARC #
What is DMARC? #
DMARC, which stands for Domain-based Message Authentication, Reporting & Conformance, is a way to determine whether an email message is actually from the sender or not. It builds on the widely deployed SPF and DKIM protocols, and adds domain alignment checking and reporting capabilities to designated recipients, to improve and monitor the protection of the domain against nefarious spoofing attempts.
Here is an illustration from dmarc.org:

Although relatively new in email authentication, DMARC has been adopted by senders and email service providers alike to prevent spoofing and phishing.
DMARC is defined in RFC 7489, and more information can be found at https://dmarc.org/.
How DMARC works #
On a high level, DMARC is based on SPF and DKIM. Together the SPF/DKIM/DMARC trio can stop the long-standing email address spoofing problem.
Here is how DMARC works: first you publish a DMARC record for your email domain in the DNS; whenever an email that claims to have originated from your domain is received, the email service provider fetches the DMARC record and checks the email message accordingly; depending on the outcome, the email is either delivered, quarantined, or rejected. Email delivery reports are sent to the email addresses specified in the DMARC record periodically, by email service providers.
There are two major aspects to DMARC:
- DMARC implements identifier alignment to eliminate the discrepancy between envelope from/header from addresses in SPF, and that between
d=value and header from address in DKIM; - DMARC adds reporting capabilities to enable email domain owners to gain visibility into email deliverability, and ultimately implement full email protection against email spoofing/phishing.
Take-away: DMARC enables you to publish a policy on your domain to dictate how you handle email messages that don’t pass DMARC authentication: no action, send to spam, or reject.
Organizational Domains #
When you see the term Organizational Domain, it simply means the “root part” of a domain.
For example, the Organizational Domain of mail.example.com is example.com.
Organizational Domain will be used to check identifier alignment in relaxed mode, described below.
The central identity #
In order to identify the originator of an email for the end user, the first thing to do is to pick a piece of information in the email, and use it as the primary identifier.
The domain in the header from address was selected as the central identity of the DMARC mechanism because it is a required message header field and therefore guaranteed to be present in compliant messages, and most email clients display the header from address as the originator of the message to end users.
For example, the following email shown in Gmail:
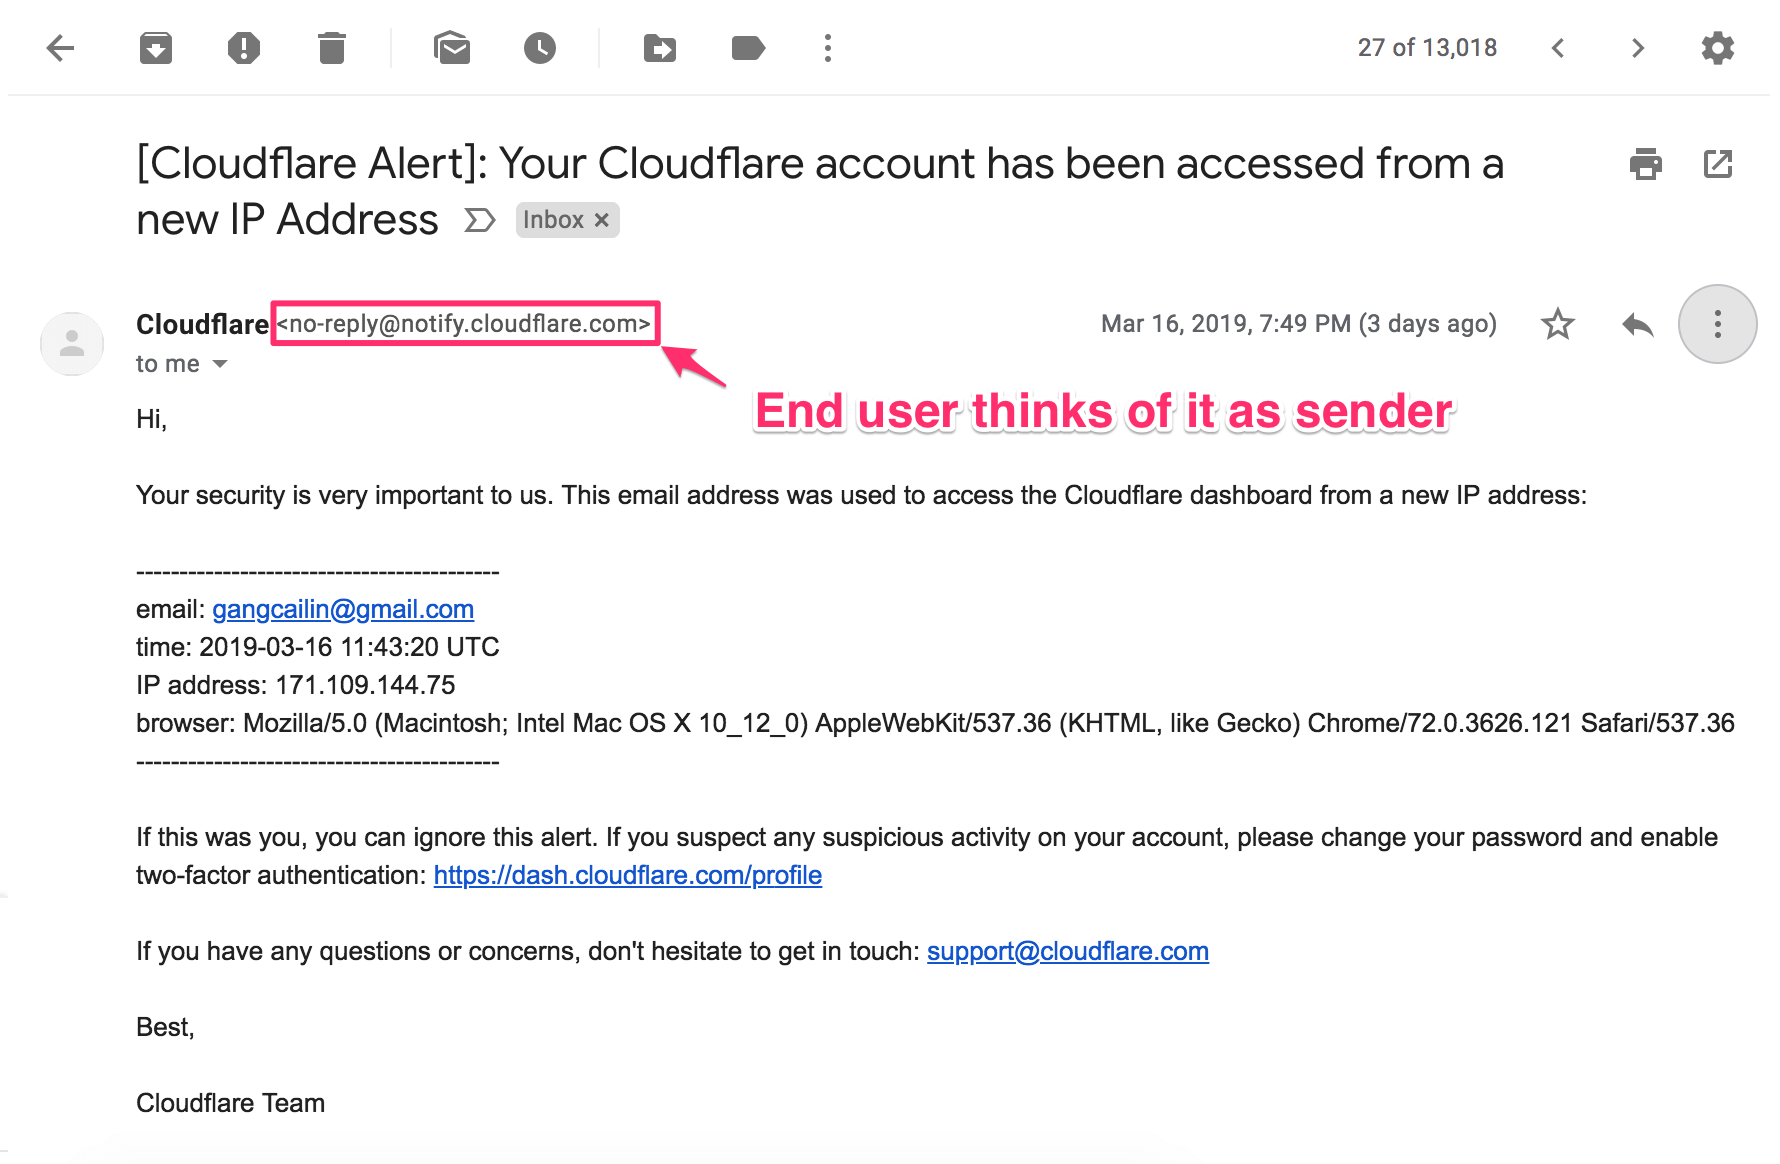
has a from field <no-reply@notify.cloudflare.com>, and it has passed DMARC check:
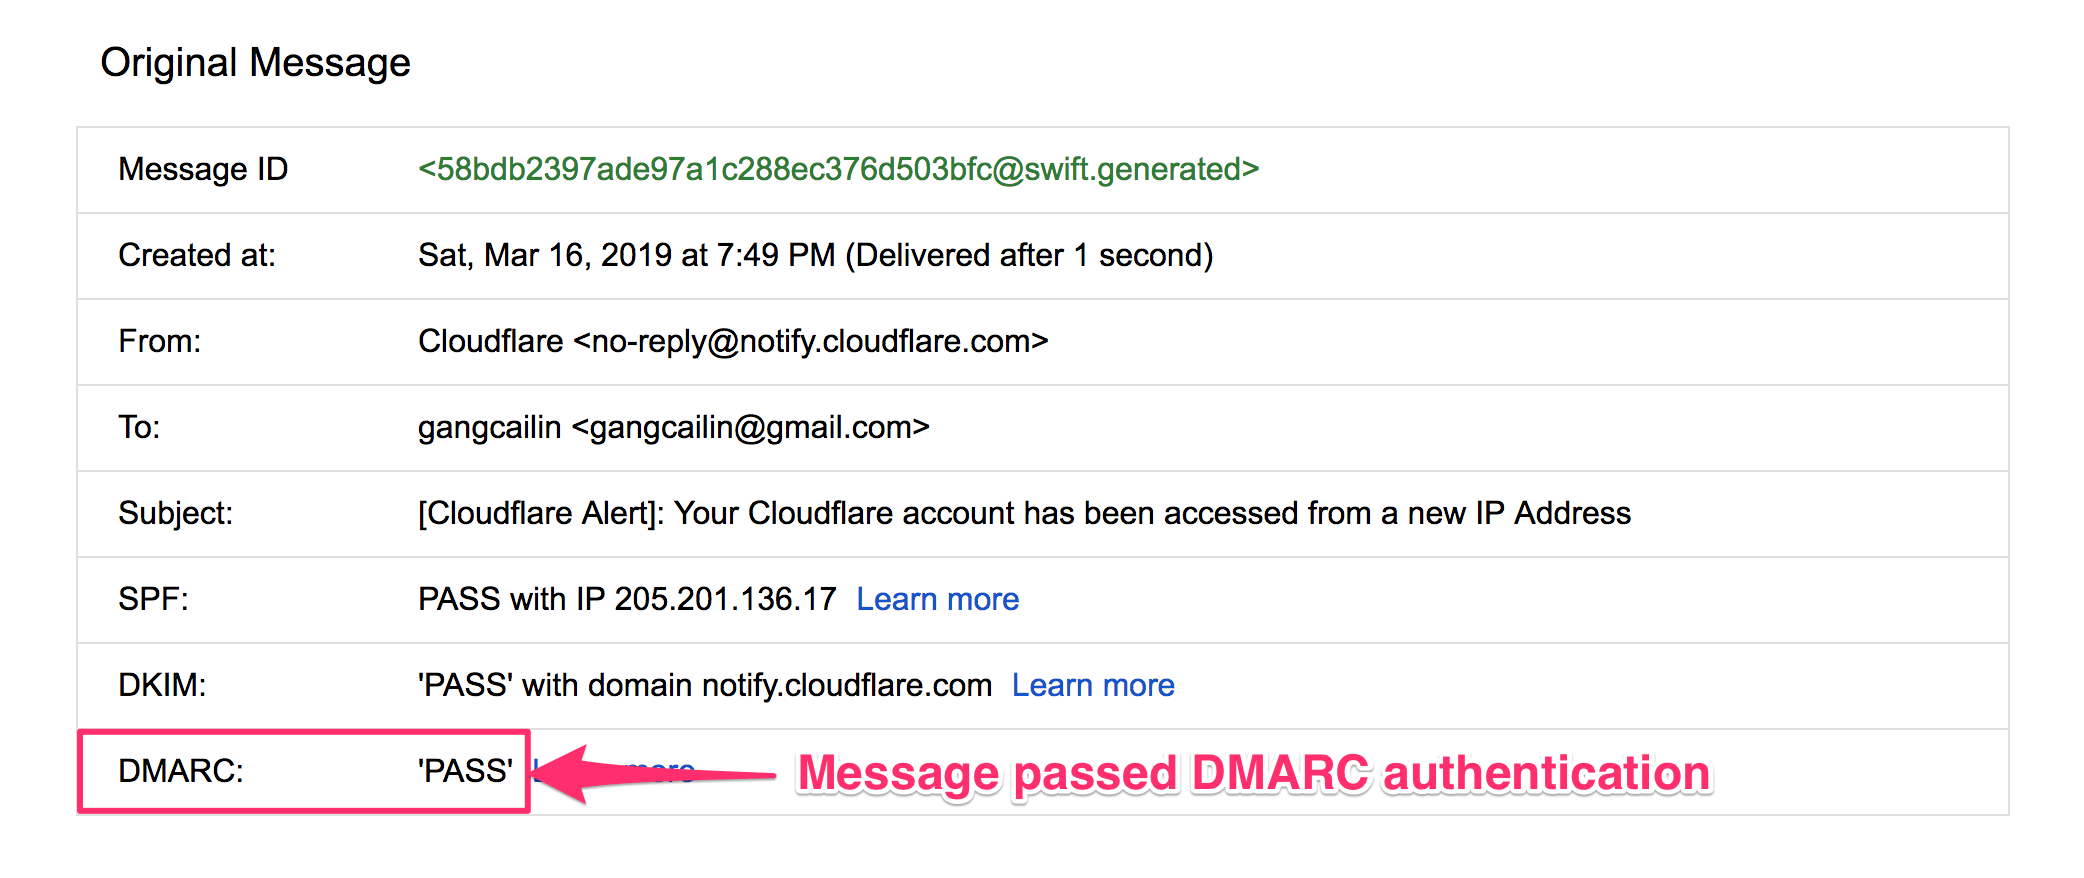
Therefore, we can confidently assert that this email does come from <no-reply@notify.cloudflare.com>.
Take-away: DMARC uses the domain in the header from address to indicate where an email comes from; this means if an email passes DMARC authentication, it does come from the domain in the From address displayed to the end user, in the email client.
Identifier alignment #
Email authentication technologies authenticate various aspects of an individual message: SPF authenticates the domain that appears in the envelope from address, while DKIM authenticates the domain found in the d= tag inside DKIM-signature in the email header. As discussed above, these domains are typically not visible to the end user and it leaves room for the header from address to be spoofed.
DMARC hardens email authentication as it does not only require SPF or DKIM to pass but it also requires at least one of the domains used by SPF or DKIM to “align with” the domain found in the from header address - the central identity. This is called identifier alignment, sometimes known as domain alignment.
SPF identifier alignment#
In the case of SPF, identifier alignment means the domain portion of the envelope from address has to align with the domain found in the header from address. In cases where the envelope from address is empty, alignment is checked against the EHLO domain.
A bit confused? No qualms whatsoever. I am going to show you some examples to make it crystal clear.
Let’s assume that SPF produces a passing result in the following examples.
Example 1: SPF in alignment
Envelope from:
<john@business.com>Header
From: john@business.com
Date: Fri, Feb 15 2019 13:14:20 -1200
To: jane@example.org
Subject: Hello!
In this case, the envelope from address and the header from address have identical domains. Thus, the identifiers are aligned.
Example 2: SPF in alignment (organizational domain)
Envelope from:
<john@mail.business.com>Header
From: john@business.com
Date: Fri, Feb 15 2019 13:14:20 -1200
To: jane@example.org
Subject: Hello!
In this case, the envelope from domain is a subdomain of the header from domain. Thus, the identifiers are in alignment if relaxed SPF mode is applied, and not in alignment if strict SPF mode is applied. For an explanation of strict/relaxed modes, check out the Alignment, strict or relaxed section.
Example 3: SPF not in alignment
Envelope from:
<john@business.com>Header
From: john@business.org
Date: Fri, Feb 15 2019 13:14:20 -1200
To: jane@example.org
Subject: Hello!
In this case, the envelope from address and the header from address are neither the same nor share the same organizational domain. Thus, the identifiers are not in alignment.
DKIM identifier alignment#
In the case of DKIM, identifier alignment means that the domain value in the d= field of DKIM-signature in the email header has to align with the domain found in the header from address. I am going to show you only one example of DKIM identifier alignment for brevity’s sake. Other cases are very similar to those SPF cases discussed above.
The following DKIM example assumes that DKIM produces a passing result.
Example: DKIM in alignment
Header
DKIM-Signature: v=1; ...; d=business.com; ...
From: john@business.com
Date: Fri, Feb 15 2019 13:14:20 -1200
To: jane@example.org
Subject: Hello!
In this case, the DKIM “d=” parameter and the header from address have identical domains. Therefore, the identifiers are in alignment.
Here is an actual email message with both SPF and DKIM in identifier alignment:

In the above illustration, the central identity is dmarcly.com, the domain in the header from address, as highlighted in the lower part.
dmarcly.com aligns with the envelope from address (Return-Path header field) domain for SPF, as well as the domain value in the d= field of DKIM-signature in the email header for DKIM. Therefore, both SPF and DKIM have identifier alignment in this case.
Alignment, strict or relaxed #
Identifier alignment in DMARC means two domains match. There are two modes in identifier alignment: strict and relaxed.
In strict mode, the two domains must be identical in order for them to be in alignment. For example: example.net aligns with example.net in strict mode, while example.net doesn’t align with mail.example.net.
In relaxed mode, the two domains don’t have to match exactly: as long as the organizational domains match, they align with each other. For example: example.net not only aligns with example.net in relaxed mode, but also aligns with mail.example.net.
DMARC alignment: authentication hardened! #
When either of the following is true of an email message, we say the email is DMARC aligned:
- it passes SPF authentication, and SPF has identifier alignment;
- it passes DKIM authentication, and DKIM has identifier alignment.
In other words, DMARC alignment = (SPF pass and identifier alignment) or (DKIM pass and identifier alignment).
When an email is DMARC aligned, it passes DMARC authentication. Basically this means that the email does indeed come from the originator it claims as the email header from address displayed to end users. Email authentication hardened!
Let take a look at the last example again:
As explained above, both SPF and DKIM have identifier alignment in this case.
Now let’s examine the SPF/DKIM authentication results:
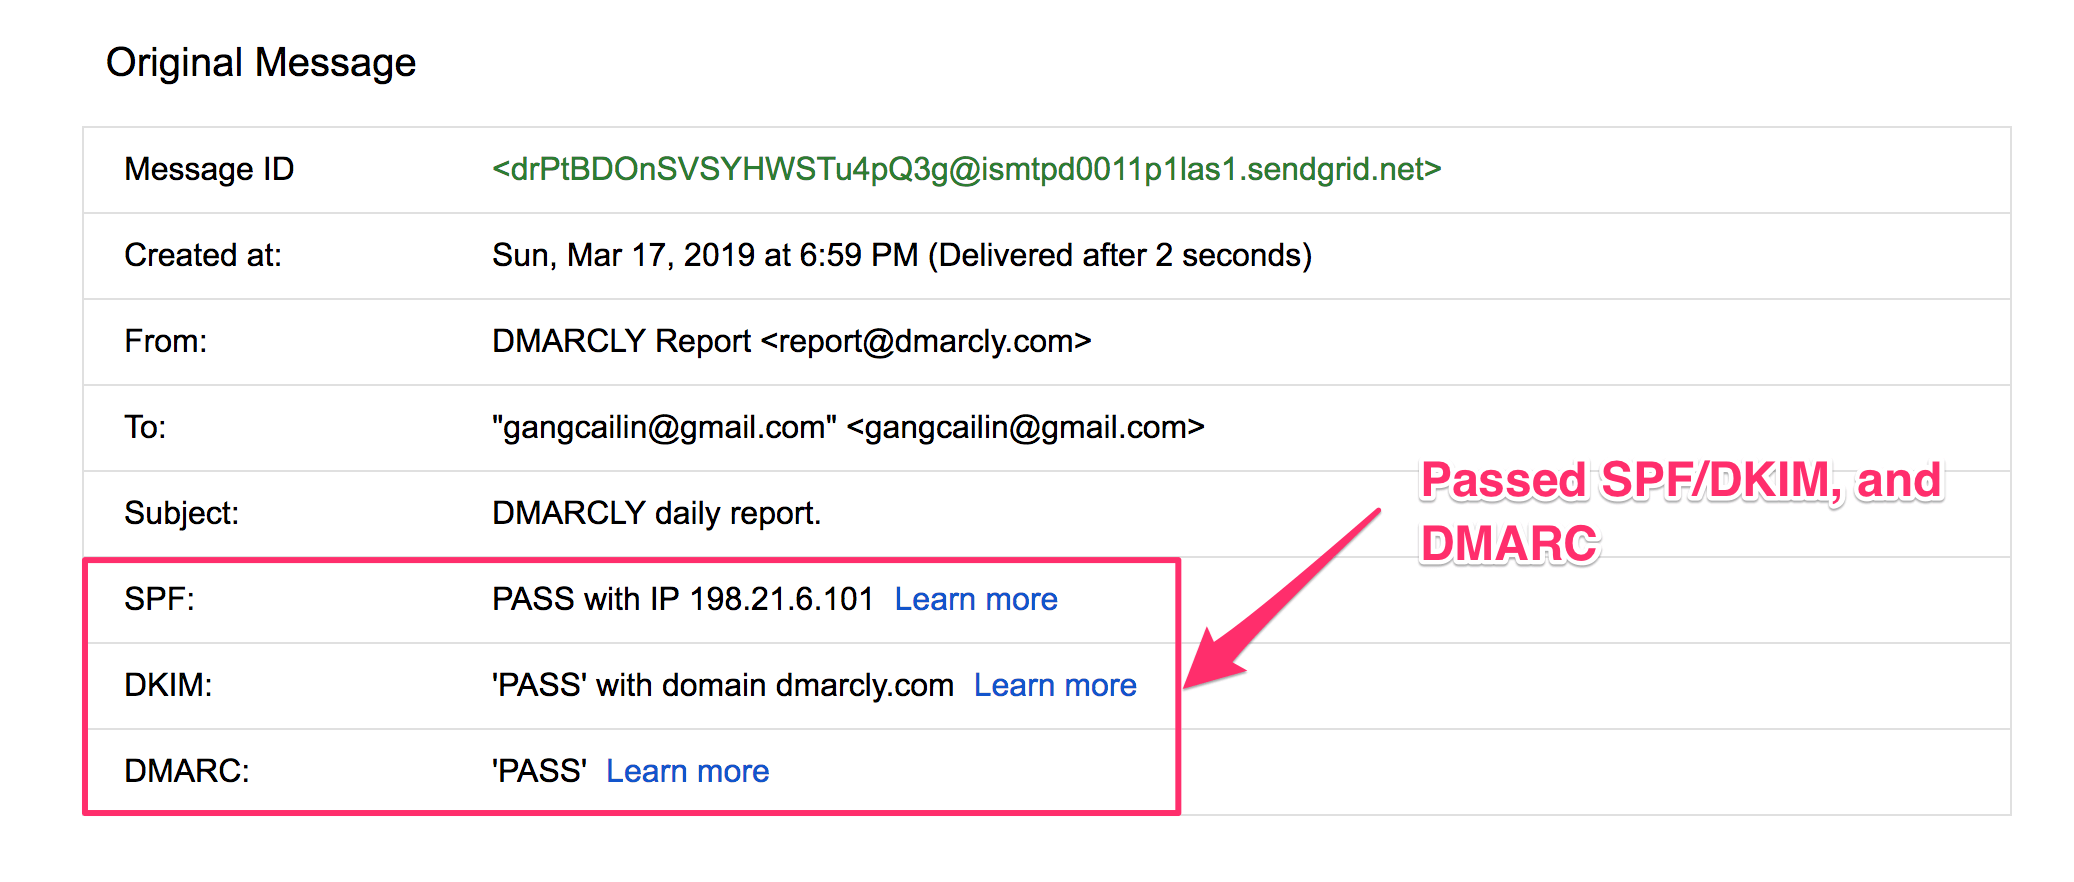
The highlighted part shows the email has passed both SPF and DKIM authentication. Therefore this email is DMARC aligned, which is confirmed in the above screenshot as well!
DMARC policy #
A DMARC policy tells the email receiver how to handle an email message if it doesn’t pass DMARC authentication. There are 3 options:
- none, also called the monitoring mode, in which no action is taken;
- quarantine; the email is moved to the spam folder (quarantined);
- reject; the email is rejected outright - the recipient will never see it.
You can specify the DMARC policy in a DMARC record, where the policy appears in the p tag, like p=none.
DMARC record #
A DMARC record is a TXT record published to the DNS for your domain, under _dmarc.yourdomain.com, where “yourdomain.com” is replaced with your actual domain (or subdomain). It tells the email receiver what to do when an email message fails DMARC authentication, and also where to send reports on email delivery statistics.
A DMARC record consists of a list of DMARC tags. The table below shows what each tag possibly found in a DMARC record means:
v: DMARC protocol version. The default is “DMARC1”;p: Apply this policy to emails that fail the DMARC check. This policy can be set to ’none’, ‘quarantine’, or ‘reject’. ’none’ is used to collect the DMARC report and gain insight into the current emailflows and their status;rua: A list of URIs for email service providers to send aggregate reports to. NOTE: this is not a list of email addresses. DMARC requires a list of URIs of the form ‘mailto:test@example.com’;ruf: A list of URIs for ISPs to send forensic reports to. NOTE: this is not a list of email addresses. DMARC requires a list of URIs of the form ‘mailto:test@example.org’;sp: This policy should be applied to email from a subdomain of this domain that fail the DMARC check. Using this tag domain owners can publish a ‘wildcard’ policy for all subdomains;fo: Forensic options. Allowed values: ‘0’ to generate reports if both DKIM and SPF fail, ‘1’ to generate reports if either DKIM or SPF fails to produce a DMARC pass result, ’d’ to generate report if DKIM has failed or ’s’ if SPF failed;rf: The reporting format for forensic reports;pct: The percentage tag instructs ISPs to only apply the DMARC policy to a percentage of failing email’s. ‘pct = 50’ will tell receivers to only apply the ‘p = ’ policy 50% of the time against email’s that fail the DMARC check. NOTE: this will not work for the ’none’ policy, but only for ‘quarantine’ or ‘reject’ policies;adkim: Specifies the ‘Alignment Mode’ for DKIM signatures, this can be either ‘r’ (Relaxed) or ’s’ (Strict). In Relaxed mode also authenticated DKIM signing domains (d=) that share a Organizational Domain with an emails From domain will pass the DMARC check. In Strict mode an exact match is required;aspf: Specifies the ‘Alignment Mode’ for SPF, this can be either ‘r’ (Relaxed) or ’s’ (Strict). In Relaxed mode also authenticated SPF domains that share a Organizational Domain with an emails From domain will pass the DMARC check. In Strict mode an exact match is required;ri: The reporting interval for how often you’d like to receive aggregate XML reports. This is a preference and ISPs could (and most likely will) send the report on different intervals (normally this will be daily).
Here are a few DMARC record examples:
v=DMARC1; p=none; rua=mailto:5b06a123456f1@ag.dmarcly.com;set DMARC policy to monitoring mode (p=none), which allows you to monitor email delivery, without sending emails to spam or rejecting them; also, send aggregate reports to5b06a123456f1@ag.dmarcly.com;v=DMARC1; p=quarantine; rua=mailto:5b06a123456f1@ag.dmarcly.com;set DMARC policy to quarantine mode (p=quarantine), which allows you to monitor email delivery, and send emails that fail DMARC authentication to spam; also, send aggregate reports to5b06a123456f1@ag.dmarcly.com;v=DMARC1; p=reject; rua=mailto:5b06a123456f1@ag.dmarcly.com;set DMARC policy to reject mode (p=reject), which allows you to monitor email delivery, and reject emails that fail DMARC authentication; also, send aggregate reports to5b06a123456f1@ag.dmarcly.com. This offers complete email protection against spoofing.
Creating a DMARC record #
To start implementing DMARC, you need to create a DMARC record.
First identify the email domain you send business emails from. For example, if you use an address sales@mycompany.com to send sales emails to prospects, the domain is mycompany.com.
Then log in to the DMARCLY dashboard, go to DNS Records -> Publish DMARC Record. The default DMARC record has already been created for you in the highlighted area, as below:

Note that there is a section below on the page where you can customize your settings for the DMARC record. The most important setting is the policy which instructs the receiving server how to handle emails that fail DMARC authentication.
Here we set the policy to None (p=none) by default, which means we put DMARC in monitoring mode, so that you can examine the percentages of emails that pass/fail DMARC authentication.
When in monitoring mode, the receiving server doesn’t quarantine/reject failing emails, and everything works just like before from your customers’ perspective. The monitoring mode gives you one benefit: you will receive DMARC aggregate reports from now on, and gain visibility into deliverability of your email program.
If you are just getting started with DMARC, you can safely ignore these settings for now. You can always come back and change the settings whenever necessary.
External destination verification #
When you use a rua tag and publish a DMARC record like this:
v=DMARC1; p=none; rua=mailto:aggregate@reporting.com;you are requesting compliant email service providers to send aggregate reports to the specified email address aggregate@reporting.com. However, the owner of aggregate@reporting.com must grant you the permission before you can do so. Otherwise, these reports won’t be sent to that particular email address. This is called external destination verification (EDV).
External destination verification works like this:
the owner of
reporting.compublishes an EDV record at:textexample.com._report._dmarc.reporting.comwith the value
v=DMARC1to the DNS, in order to enable EDV;before an email service provider sends an aggregate report to
aggregate@reporting.com, it needs to check ifreporting.comhas allowed reports onexample.comto be sent to it. It does this by lookingexample.com._report._dmarc.reporting.comup in DNS. If this record exists, and it’s value isv=DMARC1, the report will be sent; otherwise not.
Note that the above EDV record is per domain, i.e., it only allows reports on example.com to be sent to aggregate@reporting.com. If you want reports on anotherexample.com to be sent to aggregate@reporting.com, you will need to publish an EDV record for anotherexample.com.
If you want to allow reports on any domain to be sent to aggregate@reporting.com, publish a wildcard EDV record at:
*._report._dmarc.reporting.comIf you are using DMARCLY to process your DMARC reports, you don’t need to worry about EDV - DMARCLY handles that for you.
Publishing a DMARC record #
In order to put the DMARC record into action, you must publish it to the DNS.
Here is a refresher on why this is necessary: when an email arrives at the receiving server, the server extracts the domain from the email address, and looks the DMARC record up in the domain’s DNS entry. If found, it performs the actions as specified in the DMARC record.
Now log in to your DNS management console, choose the domain you need to publish the DMARC record on, i.e., mycompany.com.
Create a TXT entry on mycompany.com with these settings:
Type: TXT
Host: _dmarc
TXT Value: (DMARC record created above)
TTL: 1 hour
For example, here is what it looks like in GoDaddy’s DNS management console:

To publish a DMARC record in Cloudflare:

Now you have it! DMARC aggregate reports on that domain will drip in within a couple of days.
If you have multiple domains you want to secure, repeat the steps for each of the domains.
DMARC reports #
DMARC can send 2 types of reports upon request: aggregate reports and forensic reports.
DMARC aggregate reports provide information about percentages of email passing/failing SPF, DKIM and DMARC checks.
Although they do not come with much information about individual email messages, aggregate reports can provide valuable visibility into the health of your email program, and help you identify potential authentication issues and/or malicious activity.
You can use the rua tag in the DMARC record to specify the recipient of aggregate ports.
For example, the following rua tag requests the ESP to send aggregate reports to 5b06a123419ab@ag.dmarcly.com:
rua=mailto:5b06a123419ab@ag.dmarcly.comLearn more about DMARC aggregate reports.
In contrast, DMARC forensic reports are generated by email service providers almost immediately after an email message fails DMARC authentication. The forensic report contains message header fields, including source IP, authentication results, To and From email addresses, as well as the message body.
You can use the ruf tag in the DMARC record to specify the recipient of forensic ports.
For example, the following ruf tag requests the ESP to send forensic reports to 5b06a123419ab@fo.dmarcly.com:
ruf=mailto:5b06a123419ab@fo.dmarcly.comLearn more about DMARC failure reports.
DMARC reporting workflow #
Setting up DMARC reporting is the first step towards a full-scale DMARC implementation.
To set up DMARC reporting, you need the following:
- set up mailboxes to receive aggregate and forensic reports;
- publish a DMARC record;
- parse the reports that come along with email messages into data;
- render the data into charts.
This might seem like quite a bit of work to many, especially considering some of the tasks are repetitive on a daily basis. Some DMARC analytics tools that can automate these tasks exist on the market, though. For example, DMARCLY can handle this heavy lifting for you.
Aggregate report breakdown #
A DMARC aggregate report is an XML file, which contains several sections of interest to us. Let’s examine some of them below.
The metadata section contains meta information about the report, namely, who sent the report (org_name tag), date range (date_range tag), etc. Here is an example metadata section:
<report_metadata>
    <org_name>google.com</org_name>
    <email>noreply-dmarc-support@google.com</email>
    <extra_contact_info>https://support.google.com/a/answer/2466580</extra_contact_info>
    <report_id>2484760017677481611</report_id>
    <date_range>
      <begin>1526083200</begin>
      <end>1526169599</end>
    </date_range>
</report_metadata>
The policy published section contains the DMARC policy that applies to the messages in this report. An example:
<policy_published>
    <domain>domain.com</domain>
    <adkim>r</adkim>
    <aspf>r</aspf>
    <p>none</p>
    <sp>none</sp>
    <pct>100</pct>
</policy_published>
Next you will see a list of record sections. Each record section contains info about a group of email messages.
<record>
    <row>
      <source_ip>167.89.100.176</source_ip>
      <count>1</count>
      <policy_evaluated>
        <disposition>none</disposition>
        <dkim>pass</dkim>
        <spf>pass</spf>
      </policy_evaluated>
    </row>
    <identifiers>
      <header_from>adroitsuite.com</header_from>
    </identifiers>
    <auth_results>
      <dkim>
        <domain>adroitsuite.com</domain>
        <result>pass</result>
        <selector>s1</selector>
      </dkim>
      <spf>
        <domain>mail.adroitsuite.com</domain>
        <result>pass</result>
      </spf>
    </auth_results>
</record>
and here is the breakdown:
source_ip, which IP the email messages originate from;count, number of email messages in this group;policy_evaluated: DMARC policy evaluation result;dispositionis how the failing email messages are handled:nonemeans they are neither quarantined nor rejected;header_frominidentifiersdenotes the identifier used for DMARC authentication;auth_resultscontains SPF and DKIM authentication results.
Forensic report breakdown #
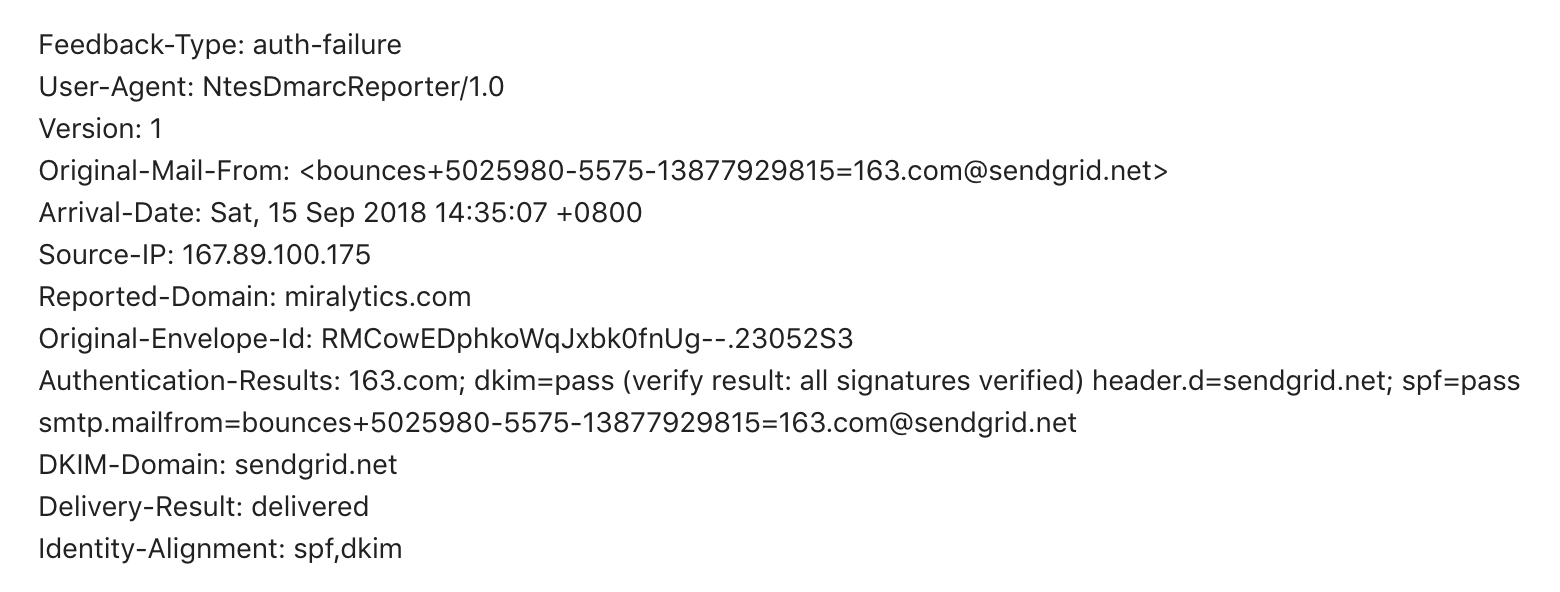
A DMARC forensic report (or DMARC failure report) consists of a feedback header and an email header.
The feedback header contains information like feedback type, reported domain, date, etc. Here is an example feedback header:
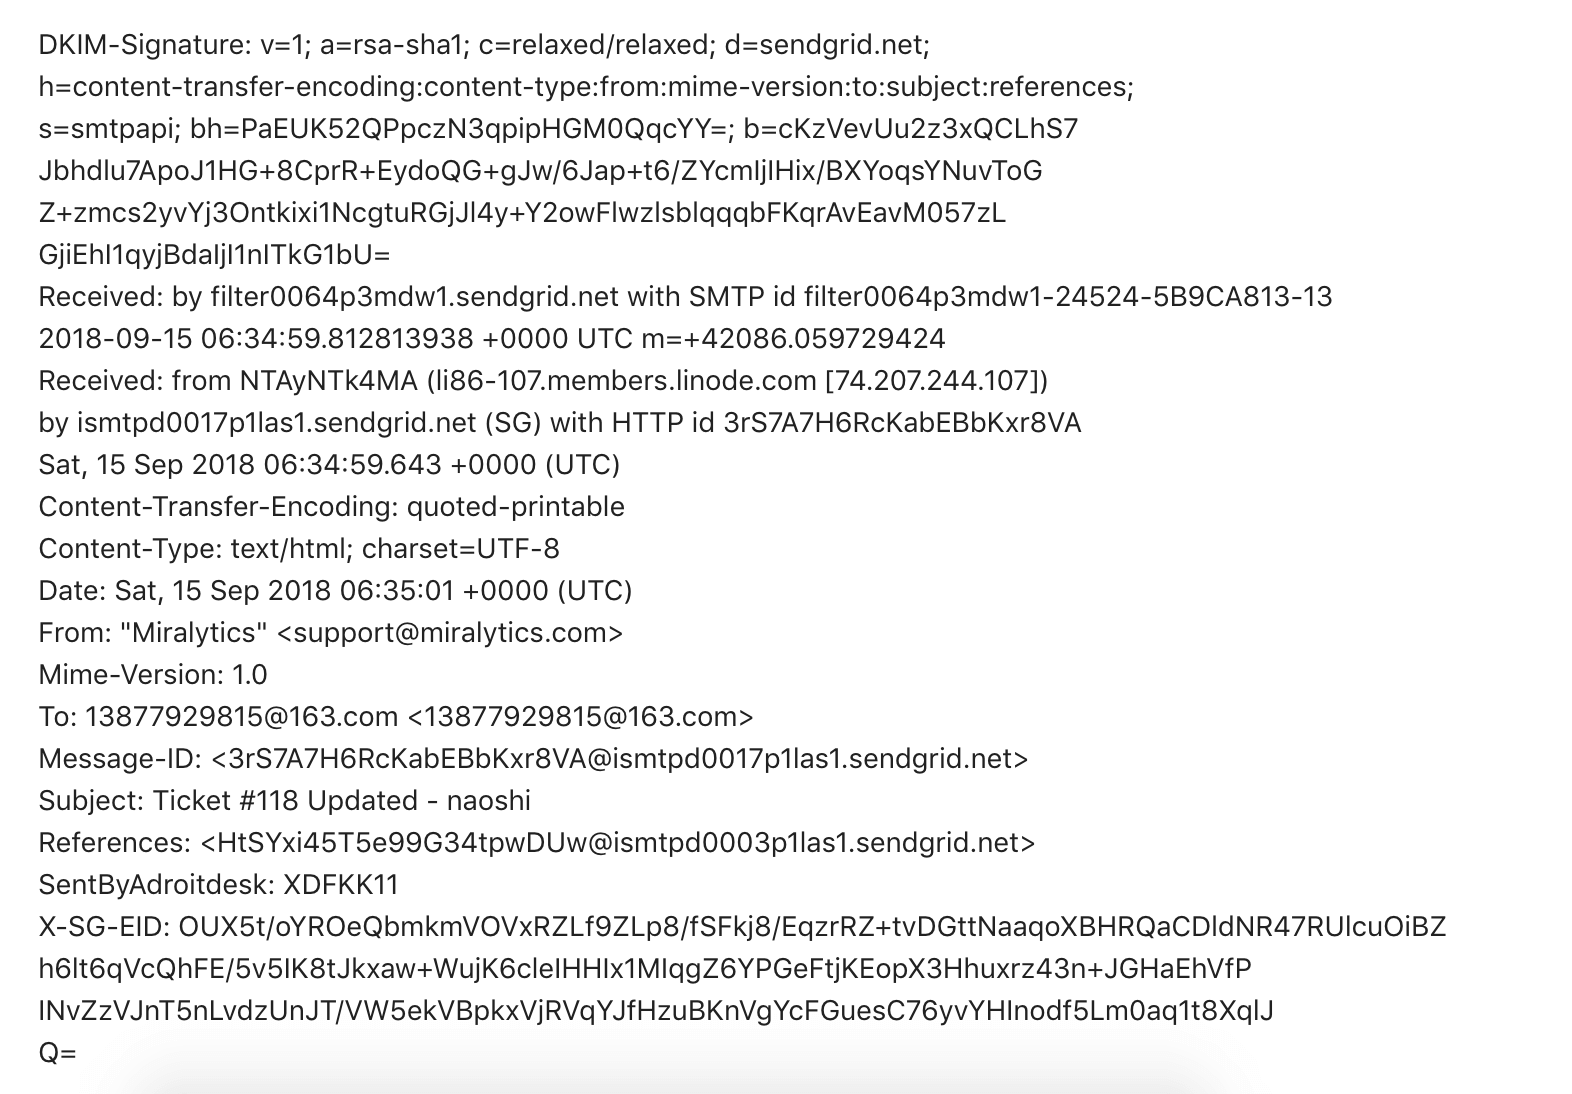
The email header contains header fields from the original email message. Here is an example email header:
Analyzing aggregate reports #
DMARC aggregate reports are encoded in XML format, which is a data format easy for machines to parse, while time-consuming for humans to read.
Here is an example aggregate report:

Manually parsing such data is not much fun and error-prone, especially if you have to do this many times every day. It’d be wise to use a DMARC analytics service to automate this process for you. Here is what it looks like after DMARCLY parses a series of aggregate reports and render them as easy to understand charts.

Updating email streams #
The main purpose of analyzing DMARC reports is to identify those email sources which fail SPF or DKIM authentication but are actually legitimate, that is, email hosts that are part of your email infrastructure.
Here is a example list of unaligned sources:

After you identify these failed legitimate email senders, update your SPF/DKIM settings so that emails from them pass authentication next time.
On the other hand, remove hosts that are not supposed to send emails on your behalf, but are passing authentication, if any.
DMARC tools #
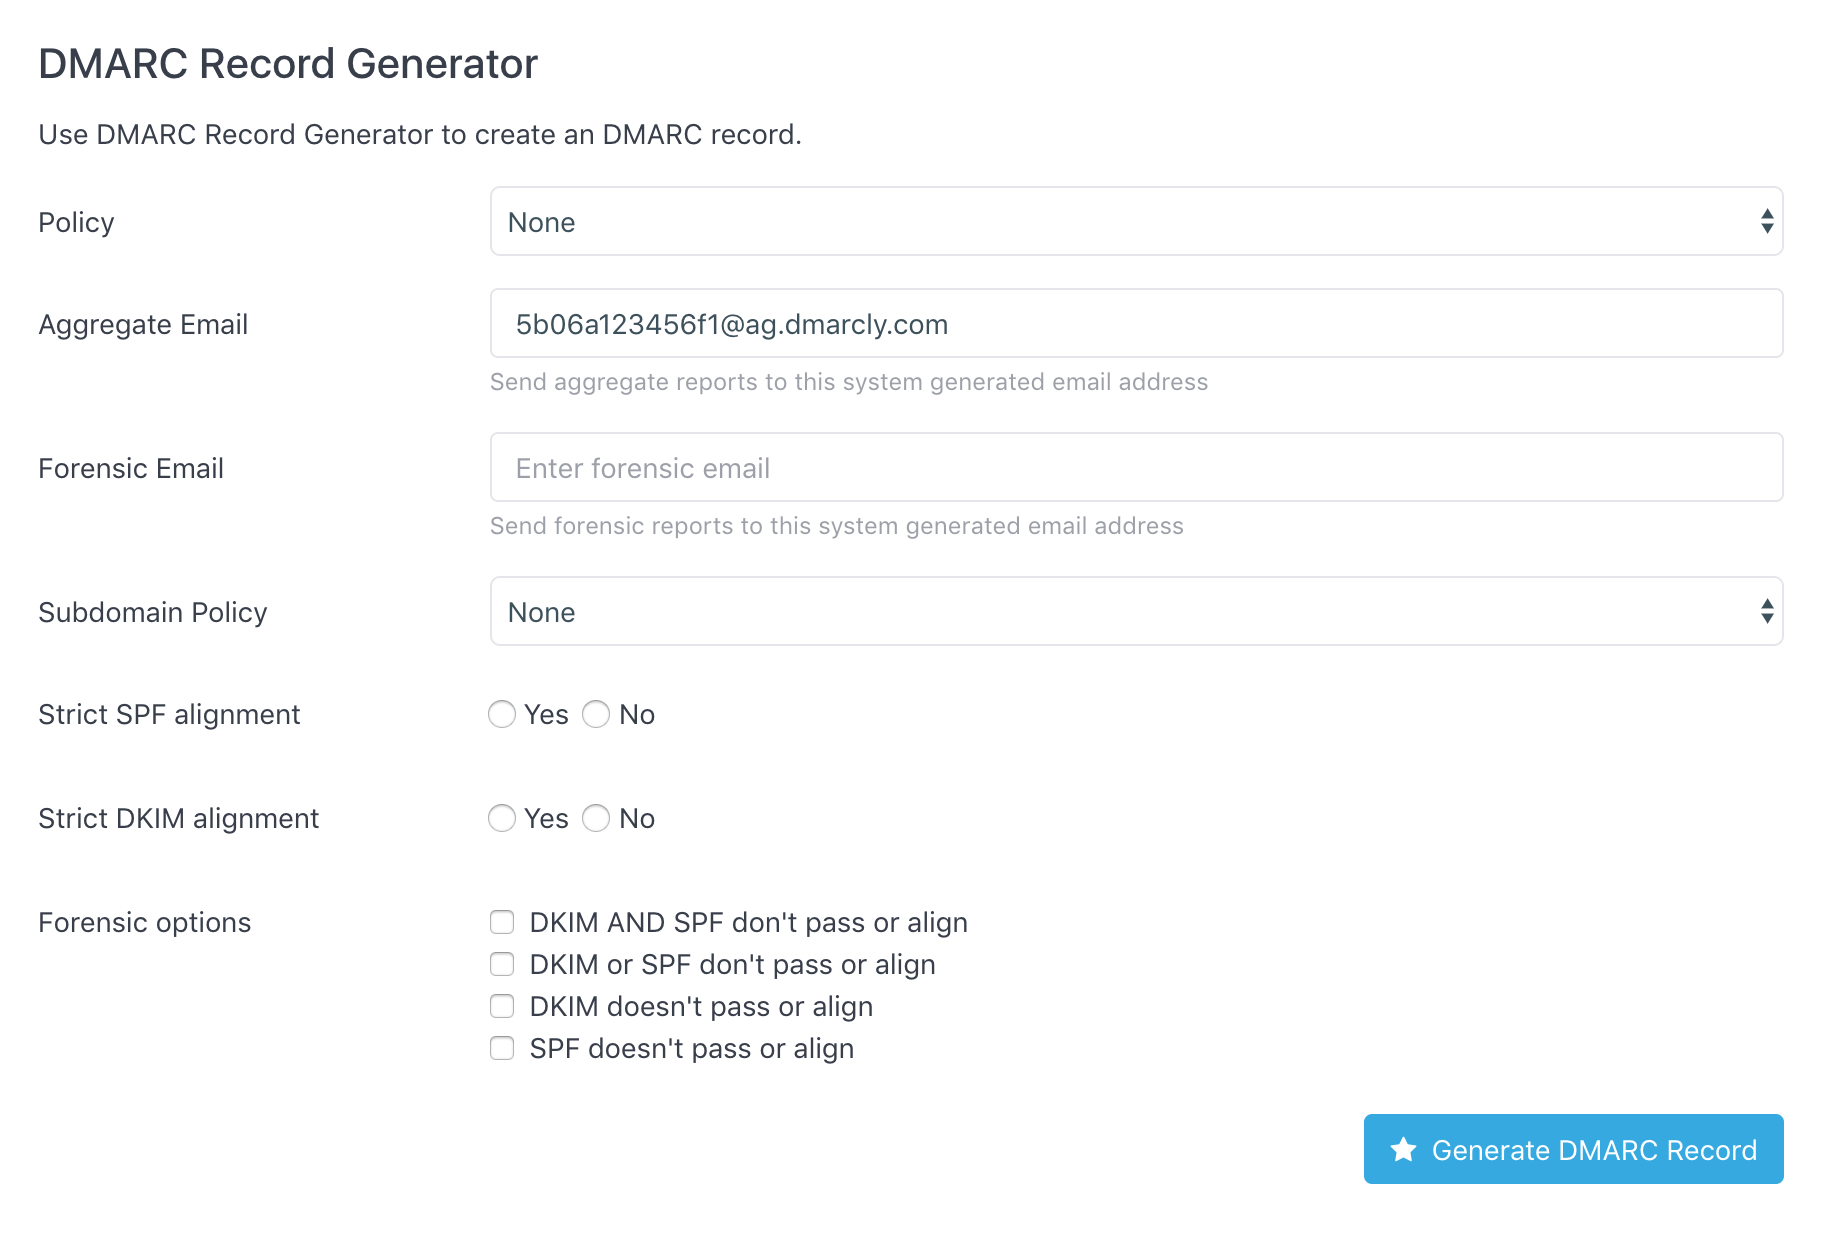
To generate a DMARC record for you domain, go to DMARC generator. Enter the settings like policy, aggregate email address, etc. and click the Generate DMARC Record button, like this:
To check if a DMARC record has been set up for your domain, go to DMARC checker. Simply enter the domain in question, and it will return the DMARC record on the domain if any. Here is an example DMARC record set up on dmarcly.com:
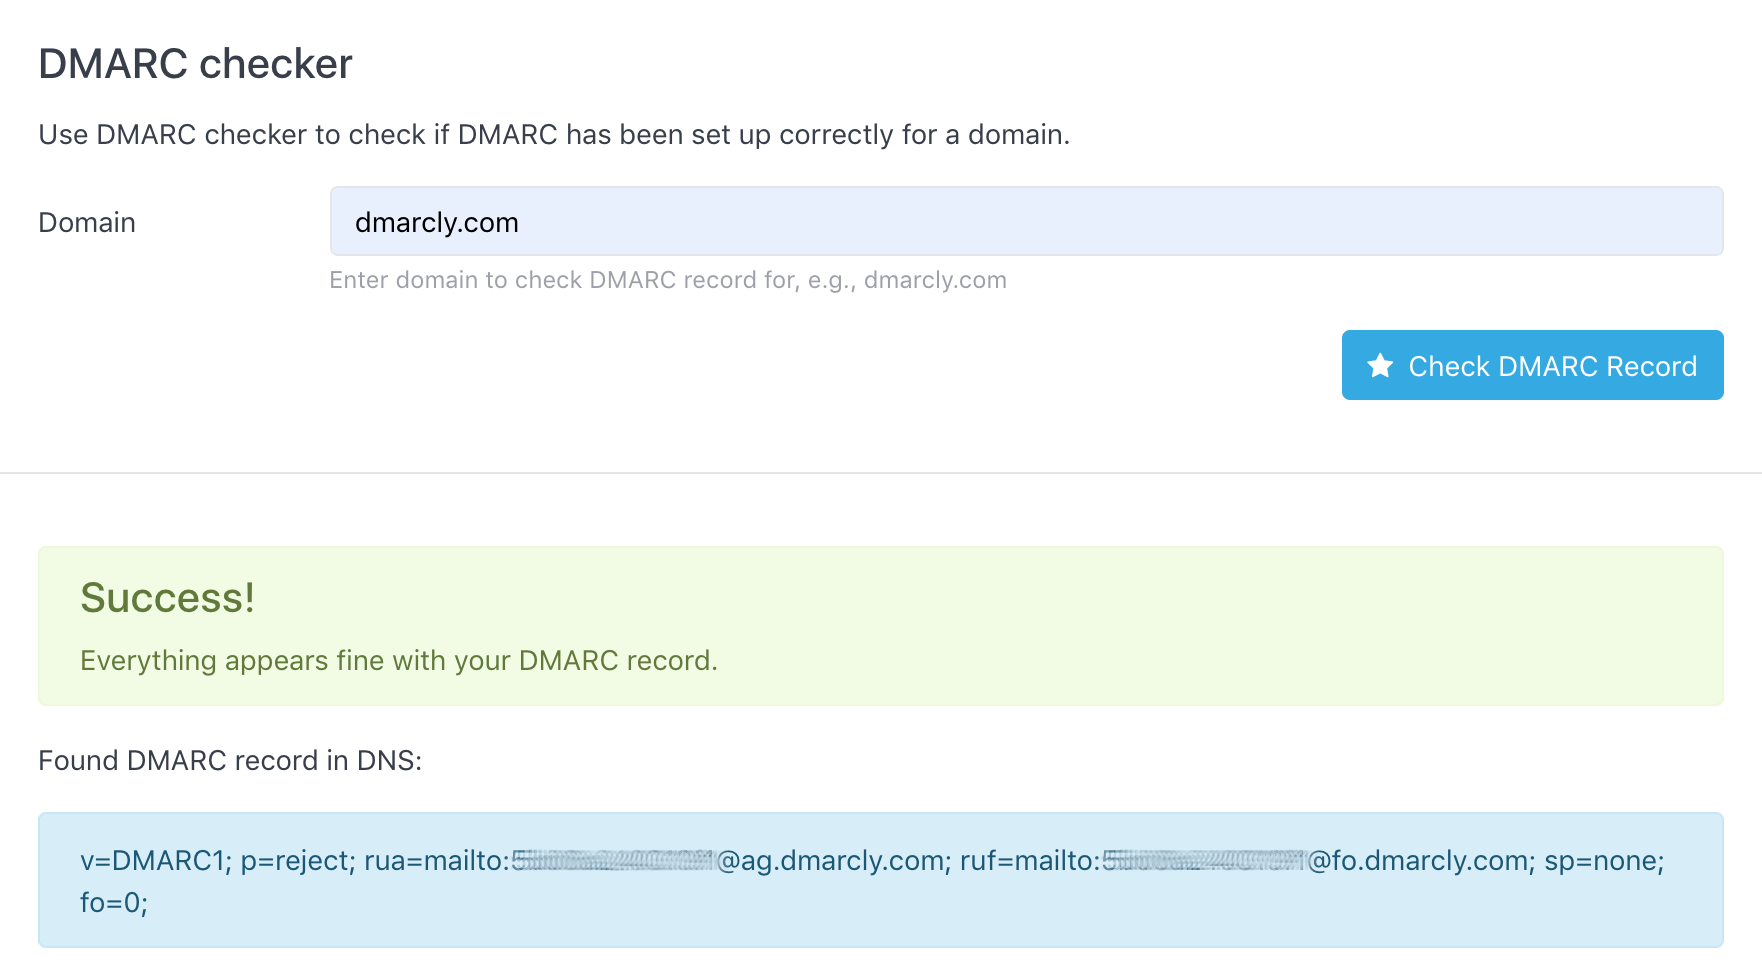
As can be seen from above, the DMARC test shows that the DMARC setup on domain dmarcly.com is correct.
You can also do a quick check by sending an email with any subject/content to check@dmarcly.com. After DMARCLY receives the email, it will perform an SPF/DKIM/DMARC authentication analysis on the sender domain and send the results back to you as a report, like this:
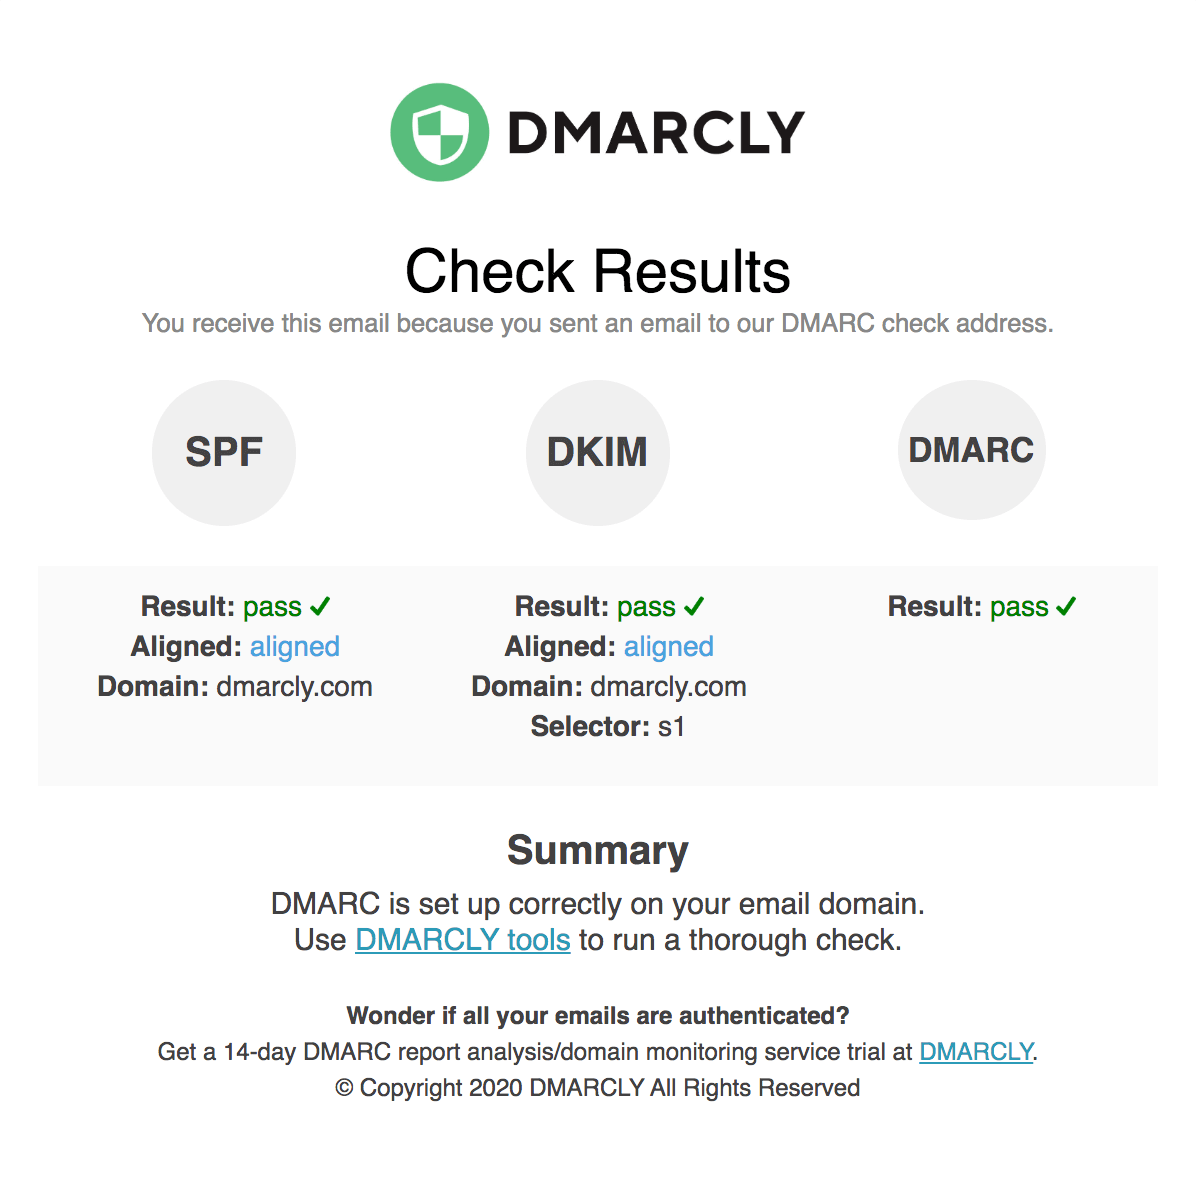
The above DMARC example report shows that DMARC is set up correctly.
For more info on checking DMARC, check this post out.
How to implement DMARC - Step by Step #
This section serves as a mini-guide with the goal to help you jump right in implementing DMARC. These actionable steps outlined below will help you avoid being overwhelmed by a myriad of technical acronyms and maintain your sanity. DMARC is not hard after all.
If you’d like to learn more about SPF/DKIM/DMARC and email overall, feel free to start from the beginning of this guide.
Now let’s implement DMARC. First things first. Inventory your email domains you want to protect, and do the following steps for each one of them.
Step 1: set up SPF #
Since DMARC is based on SPF and DKIM, it’s a good idea to start from the basics. Now let’s set up SPF.
Create an SPF record, then publish the SPF record.
Once you have saved the settings in your DNS console, give it up to 1 hour for the settings to propagate across the DNS.
Check the SPF record to make sure SPF is set up correctly before moving to the next step.
Step 2: set up DKIM #
Next set up DKIM.
Create a DKIM record, then publish the DKIM record.
If there are multiple DKIM records, make sure to publish all of them.
Similar to the SPF setup, after you have saved the settings in your DNS console, give DNS propagation up to 1 hour.
Check the DKIM records to make sure DKIM is set up correctly before moving to the next step.
Step 3: publish a DMARC record #
Now that SPF and DKIM are ready, it’s time to set up DMARC.
Create a DMARC record, then publish the DMARC record.
Remember to set the DMARC policy to none to start in monitoring mode, so that no legitimate email message will be negatively affected.
Check the DMARC record to make sure the DMARC record is correctly published after ~1 hour.
After this is done, remember DMARC aggregate reports are usually sent daily, therefore, it might take 1 day or 2 before the reports land in your designated mailbox (specified by the rua tag in your DMARC record).
Step 4: analyze DMARC reports #
Now the reports are ready! The situation can be one of:
- you use a DMARC analytics service like DMARCLY to handle all the report parsing/rendering for you; or
- you specify your own mailboxes to receive the reports.
In the first scenario, you don’t have to do the chores: setting up mailboxes, downloading reports, parsing, rendering, etc. Everything is done for you. All you have to do is to log in to the DMARCLY dashboard, view and analyze the charts. Here is an example:
In the second scenario, you need to perform the tasks mentioned above manually for each report.
Step 5: rectify email streams #
Rectifying an email stream means setting up SPF and DKIM for the source of the stream, so that all emails from that source pass DMARC authentication.
You need to identify all unauthenticated legitimate email sources, add them to the email streams, and remove everything else.
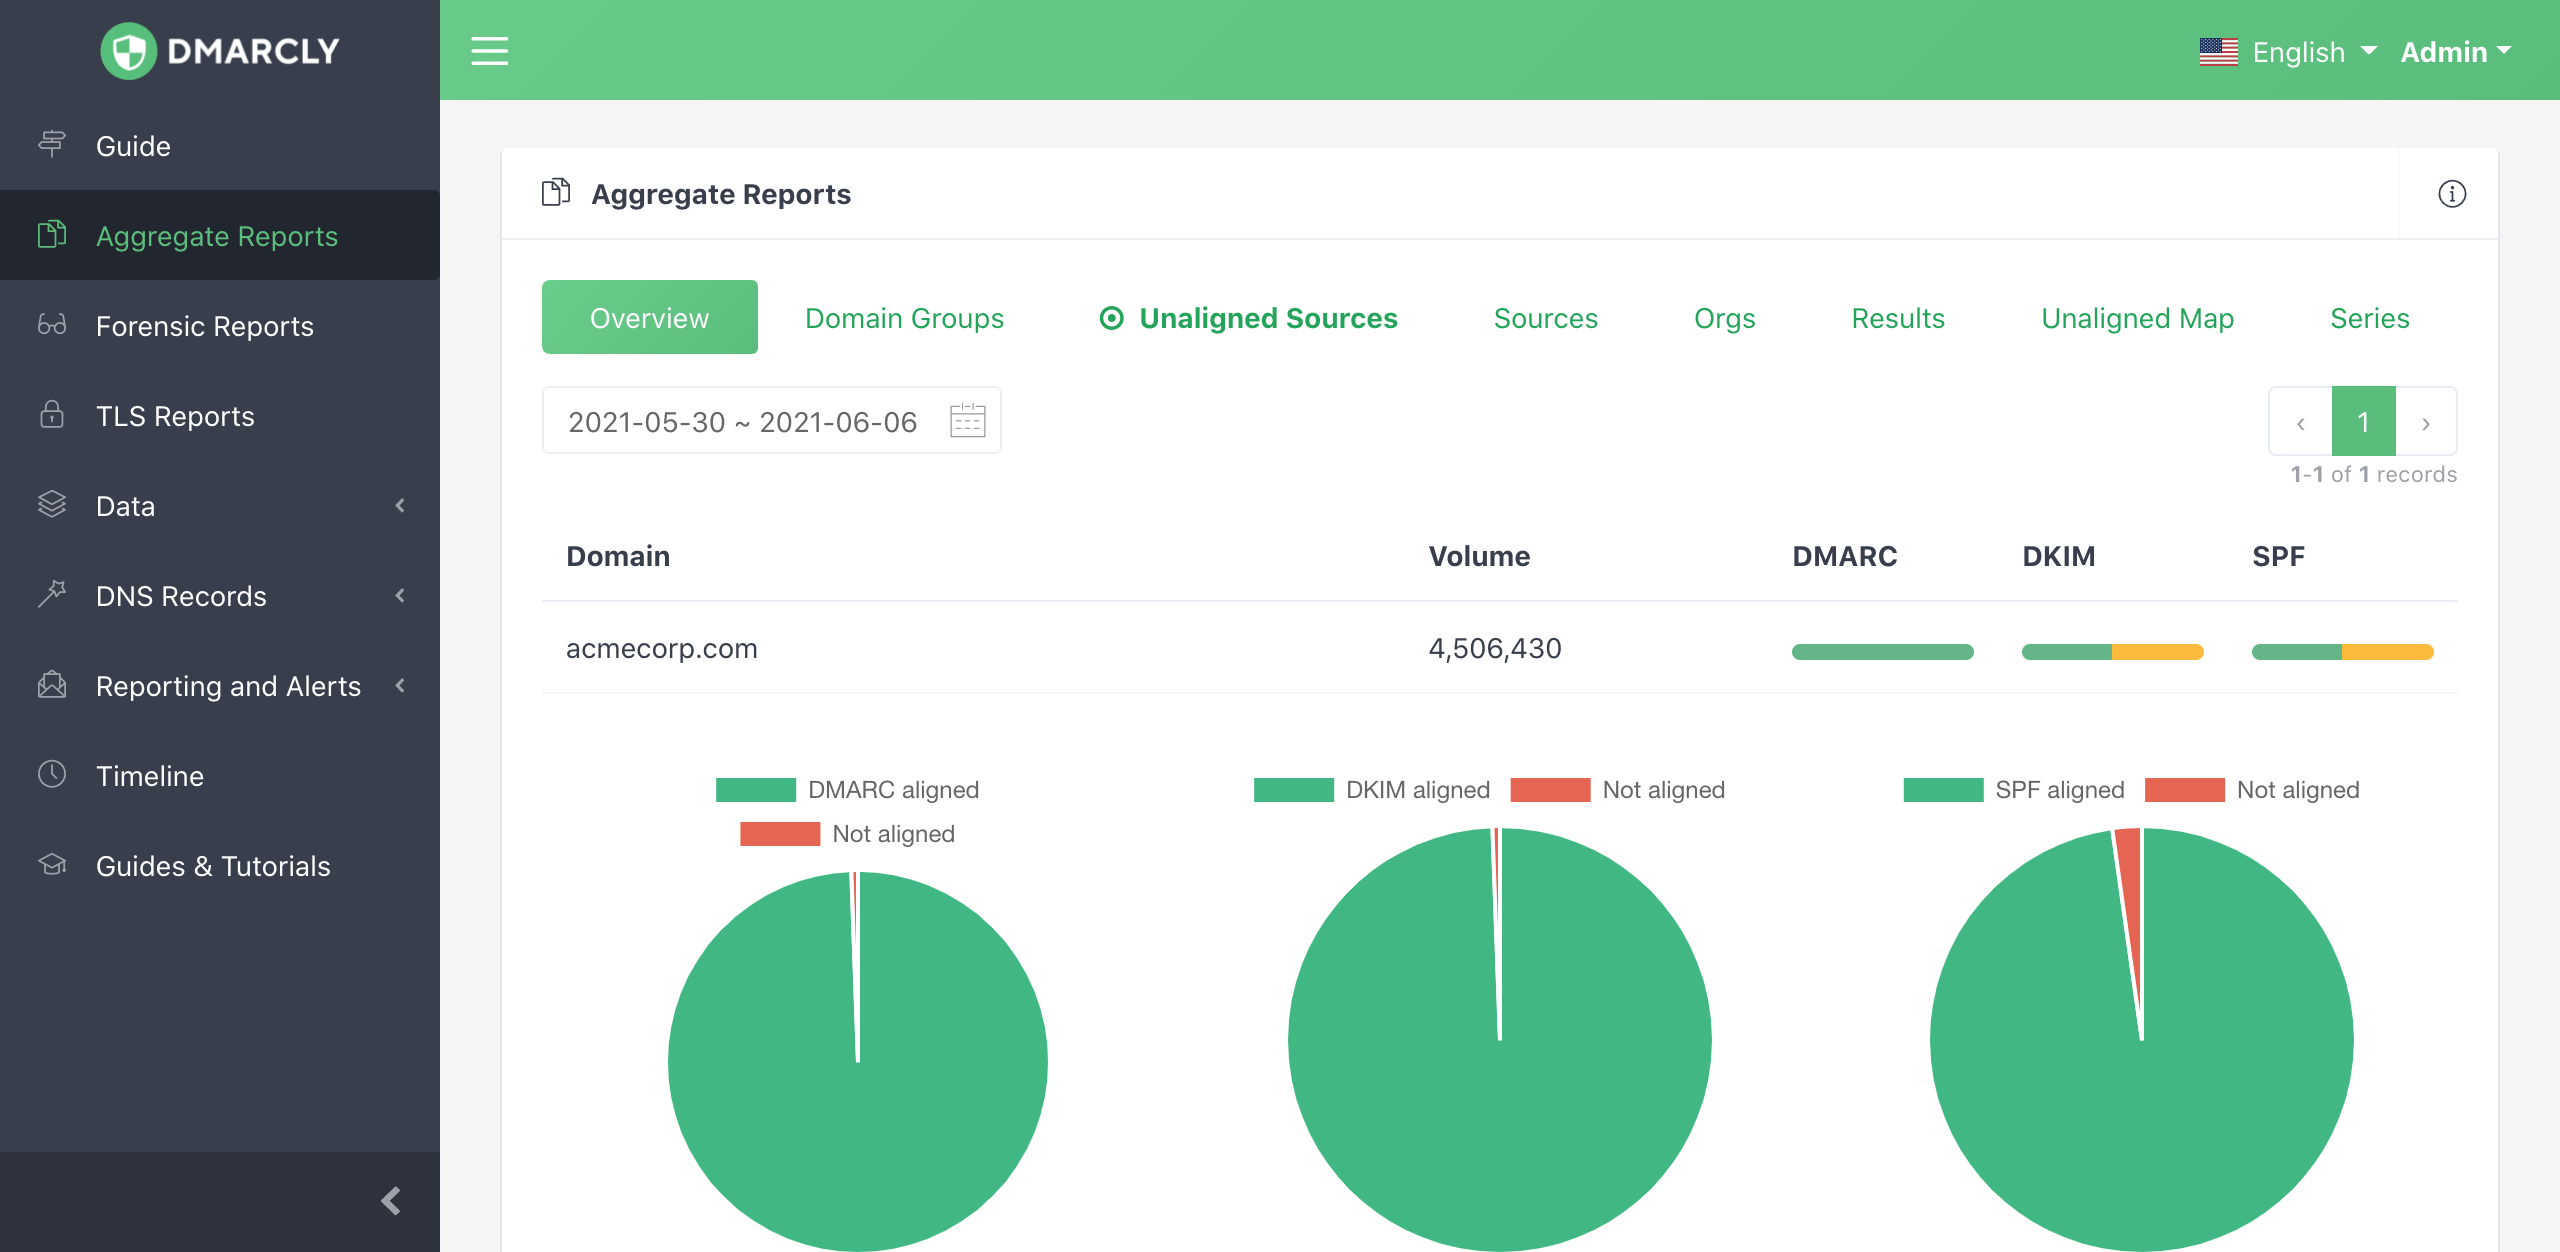
DMARCLY’s dashboard allows you to do this easily. Log in and go to Aggregate Reports, then click the Unaligned Sources tab:
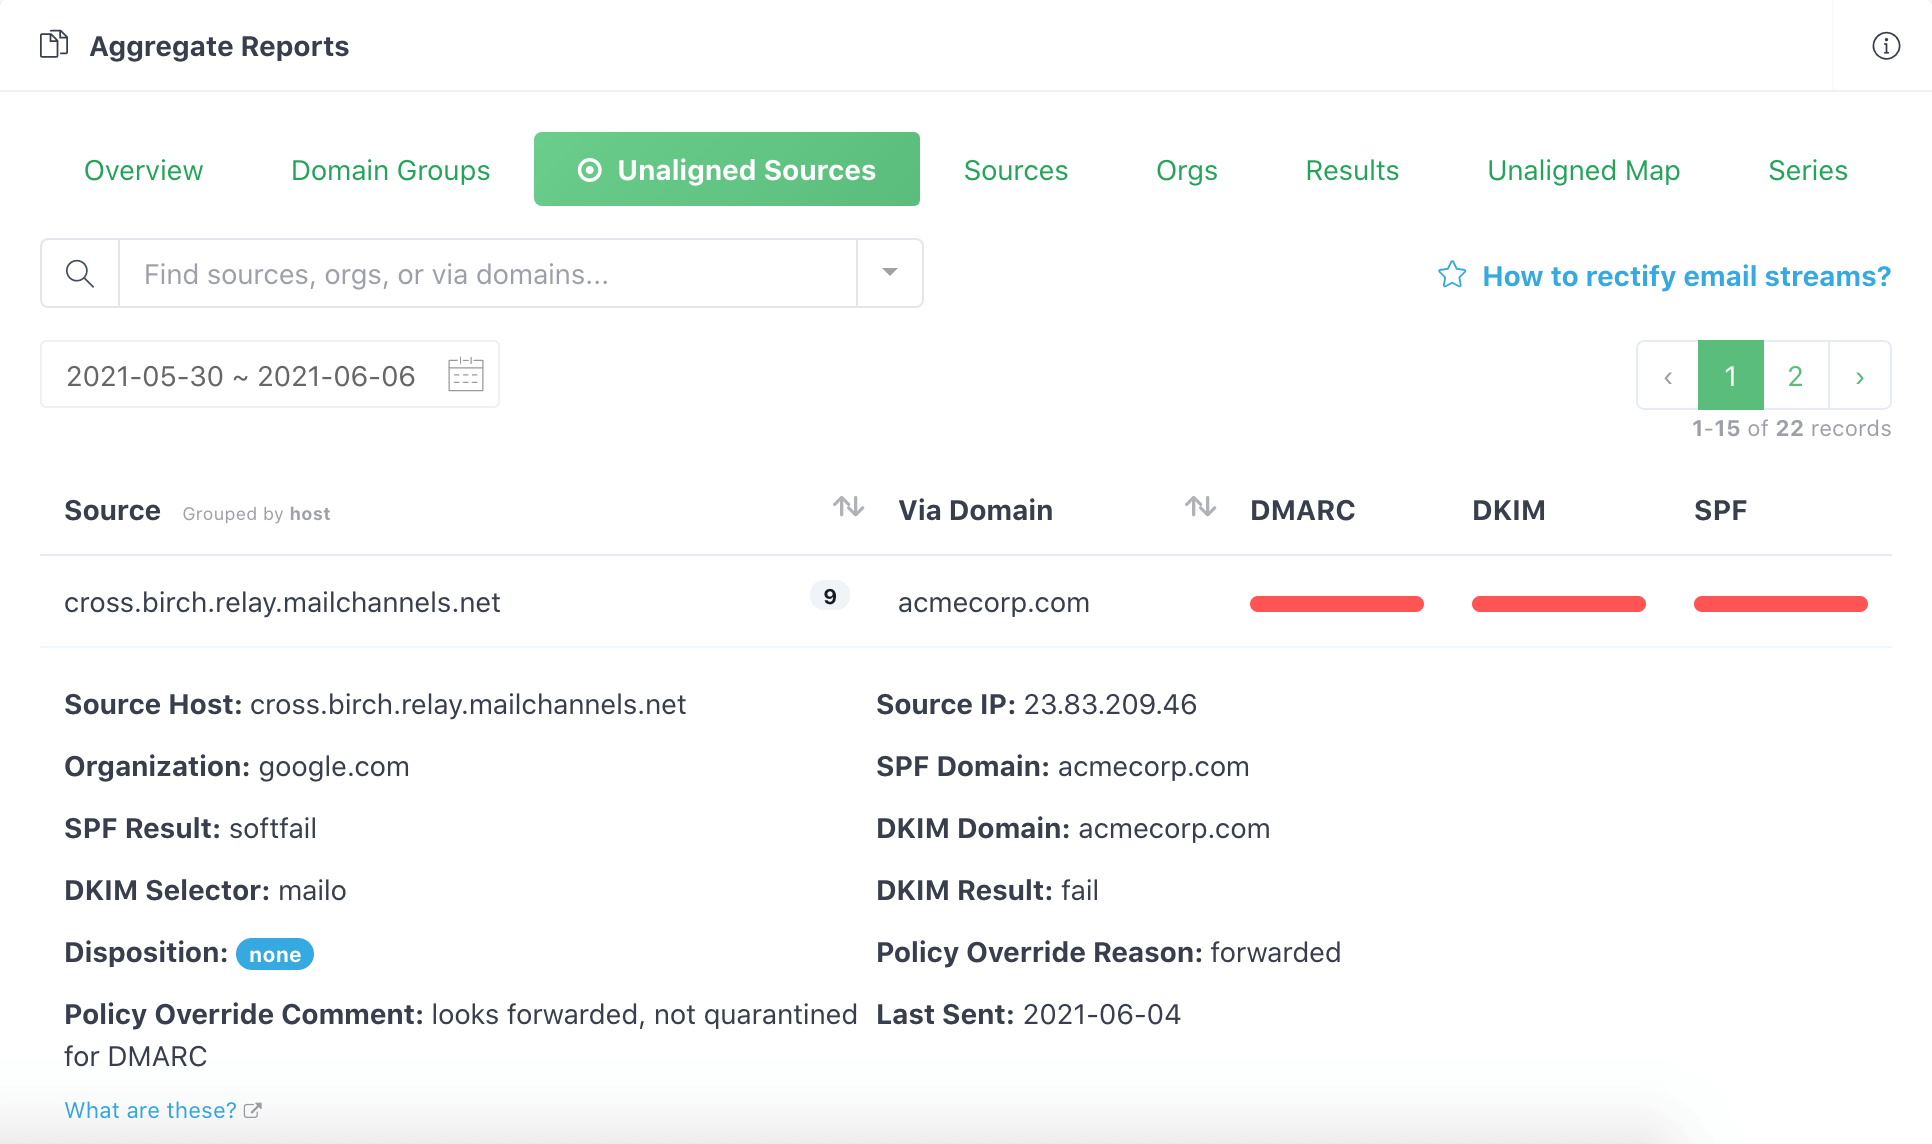
You will need to go through the unaligned sources, and add all of the legitimate ones to your email streams, so that emails from such sources pass next time.
Here is a post on how to set up SPF and DKIM for Mailchimp. If you are using other email delivery services, the steps are similar; however, the details of setting up SPF and DKIM are different, therefore you should look up the documentation of the particular service.
Next keep checking your email streams. If you find any additional unauthenticated legitimate email sources, rectify them as described above.
If you find emails from all legitimate sources pass DMARC authentication, and everything else fails, say for ~1 month, consider moving to the quarantine mode.
Step 6: transition to quarantine mode #
In the quarantine mode (p=quarantine), any email message that fails DMARC authentication is moved to the spam folder. You can consider this mode somewhat “between” no action at all (p=none) and outright rejection (p=reject).
If you find everything fine for ~3 months, consider moving to the reject mode.
Step 7: transition to reject mode (full DMARC implementation) #
In the reject mode, any email message that fails DMARC authentication is rejected outright. It’s the harshest action taken on emails that fail authentication and provides complete email protection against spoofing.
Step 8: ongoing monitoring and updating #
You have gone through a full cycle of DMARC implementation. But it’s not the end of the story.
From now on you need to keep monitoring your email streams, just to make sure everything stays fine within your email program. As the email infrastructure within your organization changes from time to time, what worked in the past might not work now. When this happens, you need to analyze the reports and update your setups accordingly, so that your domain maintains high email deliverability and a good sender reputation.
An end-to-end SPF/DKIM/DMARC wizard #
What’s even greater than the above very actionable steps, I have implemented an end-to-end SPF/DKIM/DMARC wizard. This wizard will tour your through every step toward a complete email authentication deployment, including SPF, DKIM, and DMARC.
You can take it for a spin here: End-to-end SPF/DKIM/DMARC wizard.
Other considerations #
In addition to the steps outlined above, to accomplish a complete email authentication implementation for your organization based off of SPF, DKIM, and DMARC, you also need to take the following scenarios into account, if applicable.
Setting up reverse DNS records (PTR records) #
If you send emails from your on-premises server, you must set up the reverse DNS record, otherwise many ESP’s will block your email.
A reverse DNS record, as the name suggests, maps an IP address into a host name, exactly the reverse of what a normal DNS A record does.
Here is an illustration of how a reverse DNS record works VS how a normal DNS A record works:

Best practices #
Any IP address you send email from should have a reverse DNS record (PTR record) which allows you to take a numeric IP address and get a hostname. Many ESPs will block your emails, if no PTR record is set up. This also enables you to view email sources as hostnames, rather than IP addresses.
Implement all three of SPF, DKIM, and DMARC. That’s because authenticated email makes it easier to build and monitor the reputation of the sender. Good senders using authentication can be more easily recognized, while those not using it will increasingly start at a disadvantage.
SPF best practices #
SPF has a lot of complex and powerful mechanisms, but don’t take that as a challenge to find ways to use them. Keep your SPF records as simple as possible, and don’t put any more hosts in your SPF records than you have to. This applies to the include: mechanism as well – use as few as possible, avoid nested includes whenever you can, and never use so many includes that you go over the 10 lookup limit.
If you specify blocks of addresses using CIDR notation in your SPF records, only use ranges between /30 and /16 inclusive (example: 10.10.10.0/24) – the higher the number after the slash, meaning a smaller block of addresses, the better. Avoid anything in the range /1 to /15 because some receivers will discount such blocks or even ignore them completely. And never, ever use or include a record with “+all” in it. The only way to productively use “all” is in the “~all” or “-all” mechanisms.
DKIM best practices #
First, make sure your DKIM keys are at least 1,024 bits long. Signatures made using keys shorter than 1024 bits will often be ignored completely, and this practice will become more widespread as more senders switch to keys of 2,048 bits or longer.
However, let’s not go to the other extreme either. You should not use 4096 bit or longer keys, as these may not fit within a 512-byte DNS UDP response packet. Since some DNS implementations don’t allow packets larger than 512 bytes, using super long keys might cause DKIM to fail.
DKIM is built on cryptographic digital signatures, and the science of cryptology has developed its own best practices over time. One of these is to change cryptographic keys regularly, so that bad actors don’t have years and years to try to attack the key. Unfortunately, many email senders are using keys that were created five years ago, and sometimes longer! Instead, you should switch to a new DKIM key, or “rotate” your keys, at least once a year. If you send millions of messages each month, or if they are particularly sensitive messages, you should really consider rotating your keys more often than that.
DMARC best practices #
Start using DMARC in p=none first. You’ll benefit from the reporting it provides, and it allows you to signal to email service providers that they should identify messages using your domain that don’t pass authentication.
Then gradually progress to p=quarantine and ultimately to p=reject. This means fraudulent messages using your domain can be identified and blocked, which will help protect your employees and customers while improving your domain’s reputation.
Parsing raw DMARC reports is time-consuming and error-prone. Outsourcing DMARC report analytics to a modern DMARC report analyzer service like dmarcly.com can save a lot of time and help you reach p=reject faster.
FAQs #
I have implemented SPF/DKIM/DMARC, why is my email still not delivered?#
Successful delivery of an email message depends on many factors, with email authentication being one of them. Such factors include domain reputation, whether your message contains words and/or phrases considered “spammy” by the receiving server’s local filters, etc.
Even if your email passes authentication, it could still be classified as spammy and moved to the spam folder. You may put some thought to how you can reduce the spamminess of your email.
I am not receiving DMARC forensic reports. Where are my DMARC forensic reports?!#
In contrast to DMARC aggregate reports, DMARC forensic reports contain Personally Identifiable Information (PII). Some major email service provides don’t support DMARC forensic reports since they are highly sensitive to potential privacy issues. Notably, Gmail and Yahoo Mail.
You won’t receive DMARC forensic reports if your ESP doesn’t support forensic reports.